Image Editing Tools
Move, Resize, Free Rotate, Remove Red Eye
While editing an image, you can use the icons in the Editing Tools section of the Imaging ribbon bar to move, re-size, manually rotate, and remove red eye from patient images.

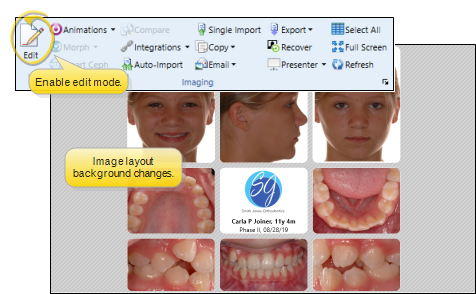
Enable Image Editing Tools
To use image editing tools, enable the Edit icon from the Imaging section of the ribbon bar. Then, select the image you want to work with. Your Edge Imaging background changes slightly to indicate when you are in Edit mode.
Editing mode is not available from cardflow layouts. You can, however, maximize individual images in a cardflow layout to edit them.
Edit an Image
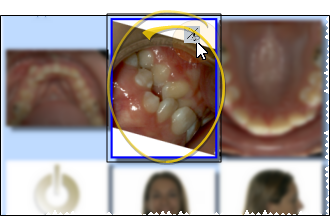
Select the image to work with, then enable the tool you want to use from the Editing Tools section of the Imaging ribbon bar.
Move / Resize the Image
Use Move/Resize to move the image in its window, or change its size. Enable this tool, then click and drag to move the image within its window. Or, right-click and drag to increase / decrease the image size (or, use the tracking wheel on your pointing device). When you use this tool while viewing an image or image comparison, your changes are ignored when you exit the screen. However, when you use this tool while in editing mode, you can choose to save the changes. In addition, you can choose to swap the left-click / right-click actions in your Image General editor so that the panning (moving) and zooming (resizing) tools use the opposite click type.

Free Rotate
Enable Free Rotate (or hold down the Ctrl key on your keyboard). Then click and hold your left mouse button while you drag to spin the image within its window. If you have to do this nearly every time for a certain type of image, you can choose to rotate that image type a specific number of degrees as they are first imported into a patient folder You can also use the Rotate 90 tool in the Actions section of the Imaging ribbon bar to rotate that specific amount.
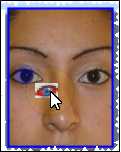
Reduce Red Eye
Enable Red Eye Removal (or hold down the Shift key on your keyboard). Click the image to work with. The image may magnify automatically, depending on your Red Eye Auto Zoom settings in your General Imaging Options. Position your cursor at one corner of the eye to work with. (You may wish to first Move the image so the eye area is centered in the window.) Then click and hold your left mouse button while you drag the cursor to select the eye area to fix. Release the mouse button to apply the changes.
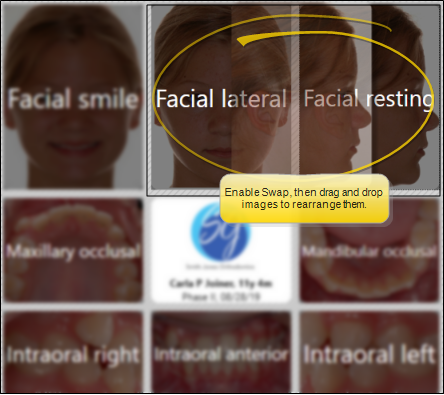
Swap (Drag and Drop) Images
You can use the Swap tool to add external images to a patient folder, or to rearrange images in a layout. Swap is available from both image Editing mode and Single Import mode. You can enable Swap from the Editing section of the Imaging ribbon bar, or by holding down the ALT key on your keyboard.
Save Changes
Click Save in your Quick Access toolbar or File ribbon bar (or press Ctrl+S on your keyboard) to save any changes you have made. If you are in Edit mode, and have enabled the Exit Edit on Save setting in your Imaging User Options, you return to viewing mode after saving the image. Otherwise, you remain in Edit mode, where you can make more changes as needed.
Cancel Changes
Click Cancel in the Imaging section of the ribbon bar to exit editing mode, ignoring any unsaved changes.
If you edit an image in error, you can use the Undo toolsin the Actions section of the Imaging ribbon bar to reverse individual changes while still in editing mode, and the Restore tool to revert an image to its original imported state even after you save changes.