Timepoint Morph
Use Timepoint Morph tools to seamlessly blend one image into another, creating an animated presentation of the changes that have occurred over the course of the patient's treatment. You can use any image type, and any number of timepoints when you create the morph. You can view the animations immediately, save them as independent video files, email them to patients and parents, upload to Facebook, or export them to Edge Animations.
This feature is a part of the Premier Imaging add-on module to Edge Imaging. Please contact Ortho2 for further information.
Premier Imaging supports two types of morphing: Image Morph tools, which give you a way to clean up and enhance an individual image, and Timepoint Morph tools which create animated presentations of the changes among two or more images. This article describes Timepoint Morphing. See "Image Morphing" for details about using Image morph tools instead.
Open Timepoint Morph Tools
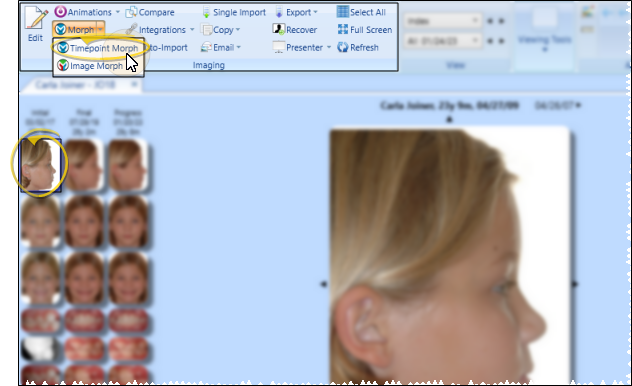
Open the patient's Imaging page, and select the image you want to work with. Then, from the Imaging section of the ribbon bar, open the Morph dropdown and select Timepoint Morph.
Select Timepoints to Include
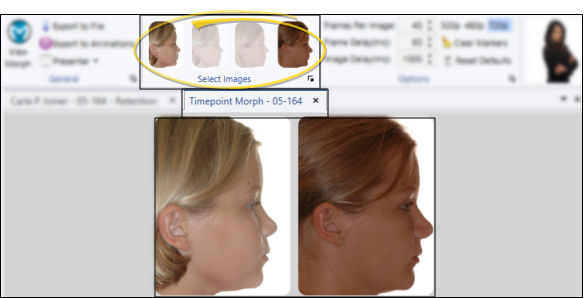
Click the images in the Select Images section of the Timepoint Morph ribbon bar to choose which timepoints you want to include in the morph. All the timepoints available for the image type you selected are available to choose from. You can do something as simple as a before and after with the initial and final images, or make a more in-depth video using all images throughout treatment. The bottom of the screen updates to display only the timepoints you have selected.
Place Markers
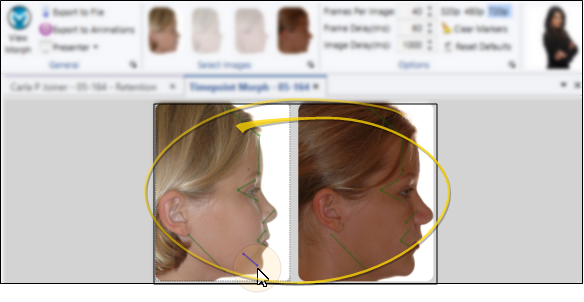
Click and drag your cursor to draw markers on all the images simultaneously. Then, adjust the markers on each image so they are consistent with each other. Markers help keep the image changes more fluid, and help you better assess and present the changes that have occurred during treatment. The more markers you place, the less grainy the images will be during the morph. At minimum you should trace the eyes, eyebrows, nose, inside of the mouth, chin, and around the head.
Two-point line - To make one line with two points, for example, to make a line under the nose, simply click where the first point should go, then click where the second point goes.
Multi-point line - To make one line with several points, for example, to make the line inside the mouth, hold down the Ctrl key on your keyboard, and click where each point should go.
Choose prominent points - When making points, pick points that are easy to select on the other image. For instance, for the eyebrows, go from the edges to arch.
Ghosting issue - When making points, pick points that are easy to select on the other image. For instance, for the eyebrows, go from the edges to arch.
Adjust Points on Each Image - After drawing a line, go through each image in the morph, adjusting the placement of the points as needed so they are consistent across images.
Clear markers - Click Clear Markers from the Options section of the Timepoint Morph ribbon bar to erase all markers from the images, including any markers you had saved from previous timepoint morphs.
Save Markers - When you exit the morphing window, you have the opportunity to save the markers you have drawn. If you choose to save the markers, the next time you open Timepoint Morph for that patient and that image type, they will be drawn on the image.
Choose the Frame Display Options
Use the Options section of the Timepoint Morph ribbon bar to adjust the frame display to determine the quality and speed of the morph.
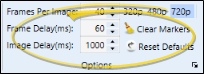
Frames per image - (Default = 40) Enter the number of morphing frames to base off each timepoint image. The more frames, the more gradual the morphing appears.
Frame delay - (Default = 60) Enter the number of milliseconds to remain on each frame, before advancing to the next frame in the morphing animation.
Image delay - (Default = 1000, or 1 second) Enter the number of milliseconds to remain on the final frame of each image included in the animation.
Pixel quality - Select the video quality to use for this animation. The better the quality, the longer the a saved morphing video will take to load, especially over poor Internet connections.
Reset options - Click Reset Options to return all frame display options to their default values.
View / Save Your Morph
Use the tools in the General section of the Timepoint Morph ribbon bar to view and save your animation.
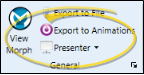
View morph - Click View Morph to animate your morph, using the markers and frame display options you have selected.
Export to file - Click Export to file to save the animated morph as a video file that you can attach to emails, upload to a web site, and play on most standard media players.
Export to Edge Animations - Click Export to Edge Animations from the Timepoint Morph ribbon bar to open Edge Animations for this patient, and create a new filmstrip that includes a copy of this morphing animation.
Presenter - Use the Presenter to duplicate whatever is currently being shown on your patient folders, responsible party pages, professional pages, Edge Animations or Edge Imaging screen onto a secondary monitor. This feature is particularly useful for showing patient images to parent and professionals, as well as presenting case, compliance, and treatment progress information.