Patient Imaging Page
The Imaging page shows you the images you have imported and scanned into this patient folder. You can select to view the images in any of your available layouts, and choose which time point to display. In addition, you can choose the background color for your patients' Imaging page in your Imaging User Options.
Open the Patient Imaging Page
Patient Folder
Open a patient folder and select the Imaging tab in the patient folder header.
Patient Information Panel
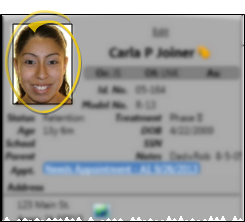
Click the patient image box at the top of the patient information panel to open that patient's Imaging page.
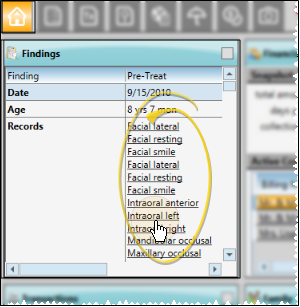
Home Page Findings Panel
When the patient Findings includes a start date, their images appear in the Records section of the Findings panel on a patient's Home page. You can click an image name from the Findings panel to open the patient's Imaging page, with that image maximized.
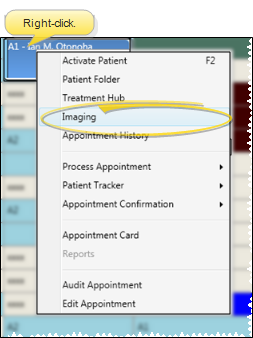
Scheduler
Right-click an appointment in your Scheduler and select Imaging to open the patient's Imaging page.
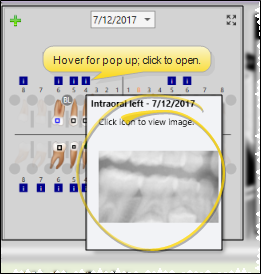
Tooth Chart
While viewing the patient's tooth chart, you can hover over the Information icon to pop up a thumbnail of the image that is linked to that tooth, or click the icon to open the patient's Imaging page, with that image maximized. See "Link X-Ray Images to Tooth Chart" for details.
Treatment Hub
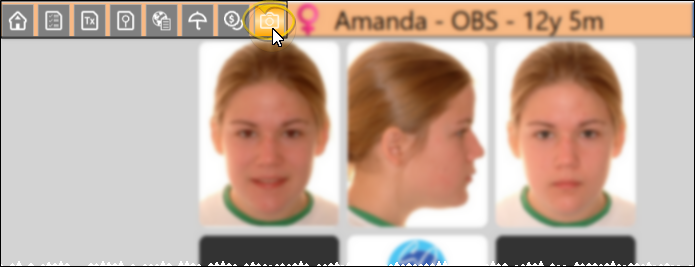
The patient's images appear on your Treatment Hub header, in the layout you select in your Imaging Layouts editor. We recommend you select a or cardflow or cardflip layout, which displays individual images, while providing you a way to view additional images and timepoints as well as maximize images from within the Treatment Hub.
Use your Treatment Hub user options to choose whether to stack the patient's tooth chart and images, or show them side-by-side. Double-clicking an image in the Treatment Hub opens the patient Imaging page to that image.
When you display the tooth chart and patient images as "stacked" in the header of your Treatment Hub, Edge Cloud remembers which tab you were viewing when you exit and re-open a patient folder. Regardless of which tab appears first, you can click the tabs to toggle your view.

Add Images to Patient Folders
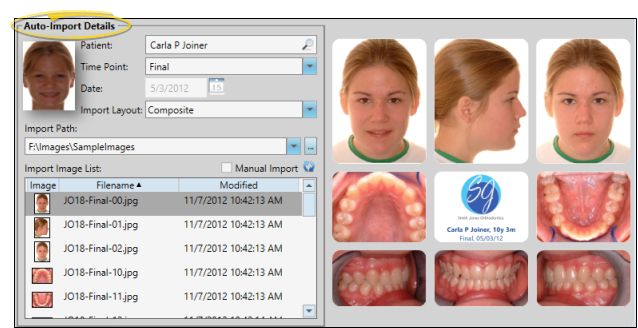
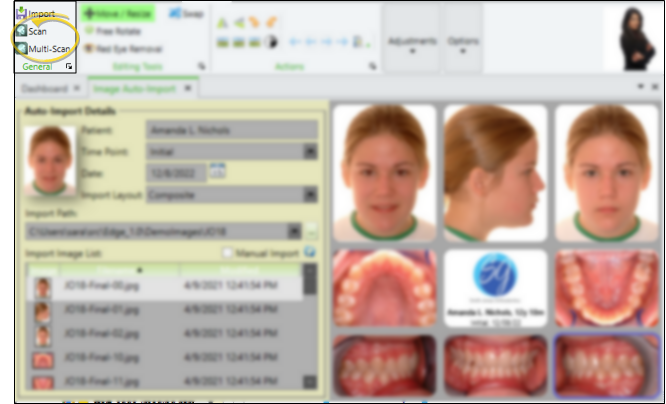
Auto-Import a Batch of Images
Use the Auto Import feature to import or scan one or more images into an imaging layout. The images are tagged with a timepoint, indicating the point in treatment when they were taken. You can auto import images into other timepoints throughout treatment, providing you with a visual progression of the patient's condition across time. See "Auto-Import Images" for details.
Single-Import Individual Images
Use the Single Import feature to add one or more individual images to a patient folder. This feature is especially useful for linking images to the patient's tooth chart, replacing images imported in error, or for completing a timepoint. See "Import Single Images" for details.
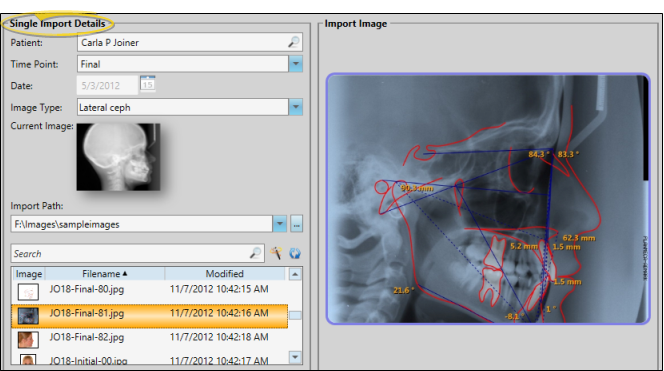
Scan Images
Use the Scan feature, available from the Single Import or Auto Import window, to add an image or multiple images to a patient record from any scanning device available to your workstation. You can scan images into previously unused image types, or overwrite the patient's existing images. This feature is often used to scan patient x-rays. See "Scan Patient Images" for details.
View Images
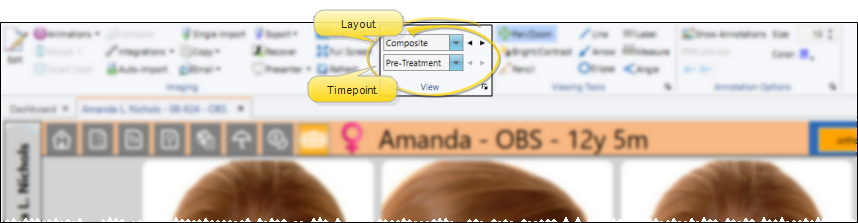
Use the View section of the Imaging ribbon bar to select the layout and time point to view.
Layout / Timepoint Selection
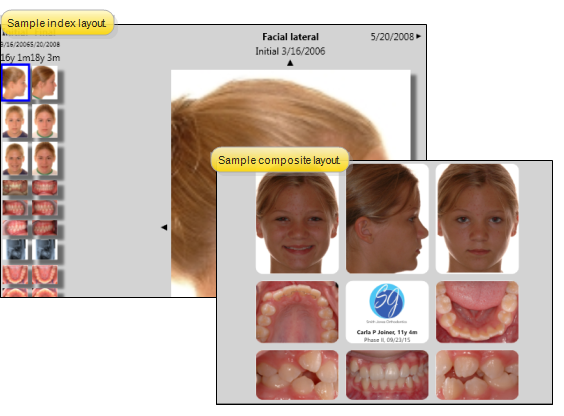
When you first open a patient's Imaging page, your default layout appears for the most recent timepoint. Depending on your Image Layout editor settings, the default layout may be dependent upon the patient's age. If you have not selected a default layout in your Image Layouts editor, the Index layout is displayed.
To view a different layout and / or timepoint, use the fields in the View section of the ribbon bar. You can either click a field and select from the drop down list, or use the < and > icons to toggle through all options.
You can set the font size for the header of your Index layout and maximized images in your Imaging User Options.
Viewing Dynamic Layouts
When you view a dynamic layout, you can choose to view a single timepoint, or all timepoints for the patient. This makes dynamic layouts a good tool for reviewing overall treatment progress. See "Image Layouts Editor" for details.
If all timepoints do not fit on the screen, use the scrollbar at the bottom or right of the window to view more.
If a layout has both Stretch to Fit and Equal Row Heights enabled, the proportions of some images may appear distorted. See "Image Layouts Editor" for details.
Viewing Index and Card Flip Layouts
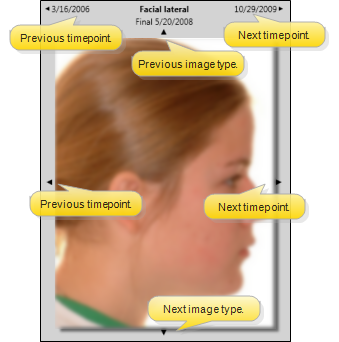
The card flip layout type is useful for displaying and moving through the patient's images one at a time. One image is positioned in the center of the screen, labeled with the caption you set up in your Image Caption editor. Click the arrows at the top and bottom of the image to scroll through additional images in this timepoint. Click the arrows on either side to view the "previous" and "next" timepoint. The ability to move throughout a series of images and timepoints makes the card flip layout a good choice for viewing from a patient treatment chart.
Viewing Card Flow Layouts
The card flow layout type is an attractive presentation tool. One image is positioned in the center of the screen clearly labeled with the image type, timepoint and date. Click Over to see a smaller version of the image along with the image details, and the age of the patient at the time the image was taken. You can also click an image that comes "before" or "after" the current image to bring that image to the foreground, or use the scroll bar at the bottom of the window to move forward and backward through the series of images.
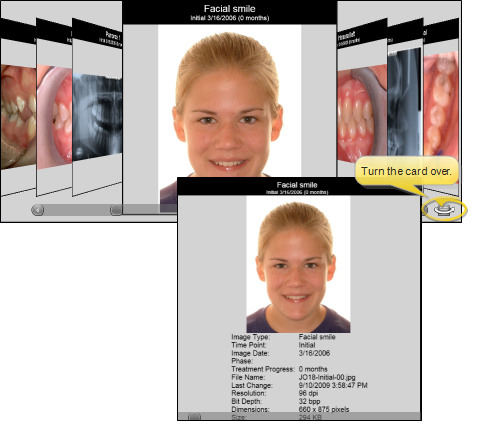
Maximizing Images
Maximize an image to display that single image as large as possible in the imaging window, providing a closer look at the patient's condition. See "Maximize Images" for details.
Edit Images
Click Edit from the Imaging section of the Edge Imaging ribbon bar to open a ribbon bar full of image editing tools.

Editing Tools
While editing an image, you can use the icons in the Editing Tools section of the Imaging ribbon bar to move, re-size, manually rotate, and remove red eye from patient images. See "Image Editing Tools" for details.

Actions
While editing an image, you can use the tools in the Actions section of the Imaging ribbon bar to change the image orientation, manipulate image resolution, and access image and time point properties. The Actions tools also provide you with a way to reverse or re-apply changes you have made to your images. See "Image Editing Actions" for details.

Adjustments
While in imaging Edit mode, you can use the slider bars in the Adjustments section of the Imaging ribbon bar to manually adjust the brightness, gamma, saturation, contrast, and hue values of your images. See "Adjust Image Color Values" for details.

Options
While in imaging Edit mode, you can use the tools in the Options section of the Imaging ribbon bar to enable / disable viewing tools that are designed to help make editing more accurate. See "Image Edit Mode Options" for details.

Imaging Tools
Use the Imaging section of the Imaging ribbon bar to morph images and time points, initiate integrations, compare, copy, email and export images, import images into the patient folder, and more.
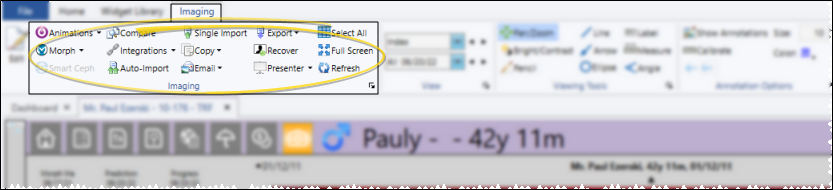
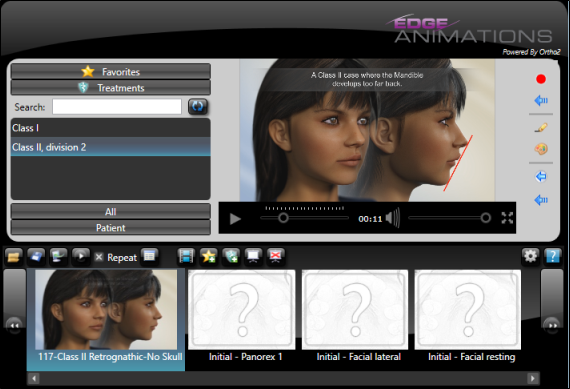
Animations
Click Animations from the Imaging section of the Edge Imaging ribbon bar to open Edge Animations with this patient's images loaded. See "Edge Animations" for details.
Timepoint Morph
This feature is a part of the Premier Imaging add-on module to Edge Imaging. Please contact Ortho2 for further information.
Use Timepoint Morph tools to seamlessly blend one image into another, creating an animated presentation of the changes that have occurred over the course of the patient's treatment. You can use any image type, and any number of timepoints when you create the morph. You can view the animations immediately, save them as independent video files, email them to patients and parents, upload to Facebook, or export them to Edge Animations. See "Timepoint Morph" for details.
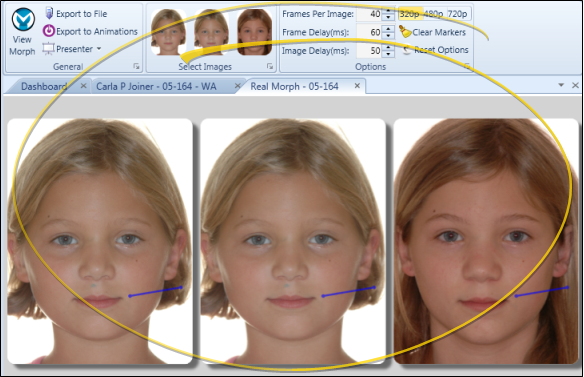
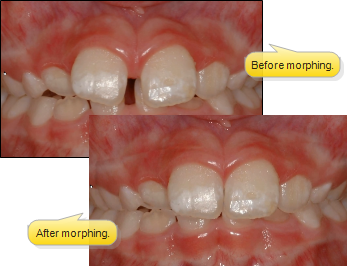
Image Morph
This feature is a part of the Premier Imaging add-on module to Edge Imaging. Please contact Ortho2 for further information.
Use Image Morph tools to cosmetically manipulate images. This feature is especially useful for cleaning up patient photos, sharpening the details of x-ray images, and showing patients the potential results of orthodontic treatment. See "Image Morphing" for details.
SmartCeph
This feature is a part of the Premier Imaging add-on module to Edge Imaging. Please contact Ortho2 for further information.
To open SmartCeph, first, select the patient's lateral ceph, then click the SmartCeph icon. SmartCeph is available only when you have selected to view the patient's lateral ceph: Otherwise, the button appears dim on the ribbon bar. When you save a traced ceph or analysis report in SmartCeph, a copy is saved in the appropriate timepoint of the patient's Edge Imaging page. You can view these images from the Index layout, or from any layout that includes SmartCeph image types. See "Introduction to SmartCeph" for details.
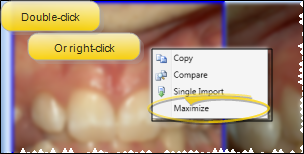
Compare Images
Choose Compare from the Imaging section of the Edge Imaging ribbon bar, or right-click the image and select Compare, to open the Compare Images window with this image as the default first image to use. See "Compare Images" for details.

Integrations
Click Integrations from the Imaging section of the Edge Imaging ribbon bar, then select the Edge Imaging integration to open, such as Submit ABO Case.
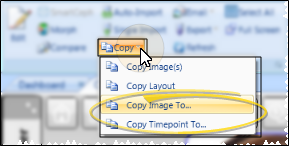
Copy to Clipboard
Choose Copy from the Imaging section of the Edge Imaging ribbon bar and choose to copy this image or the entire layout to your clipboard. Or right-click the image and select Copy to copy just the selected image. See "Copy a Patient Image / Layout to the Clipboard" for details.
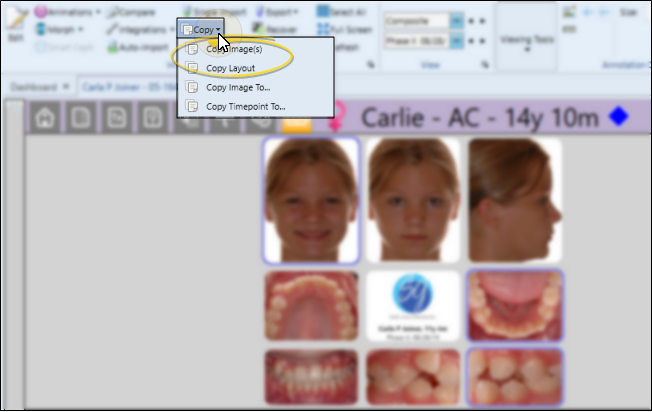
Copy to Another Patient
Choose Copy, then Copy To from the Imaging section of the Edge Imaging ribbon bar, and choose to copy this image or all the images in the entire time point to another patient. Or, right-click the image and select Copy To to copy just the selected image. See "Copy a Patient Image / Timepoint to Another Patient" for details.
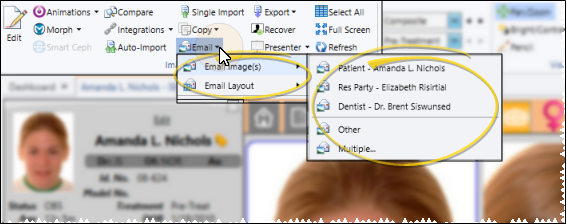
Email Image
Choose Email from the Imaging section of the Edge Imaging ribbon bar, and choose to email the selected image or the entire layout to one or more recipients. Or, right-click the image and select Email to send this image as an email attachment. See "Email Patient Images & Layouts" for details.
Export
Choose Export from the Imaging section of the Edge Imaging ribbon bar and choose to export the selected image, the original version of the image, or the entire layout as a .JPG file. Or right-click the image and select Export to save this image as a .JPG file. See "Export Images and Layouts to JPG" for details.

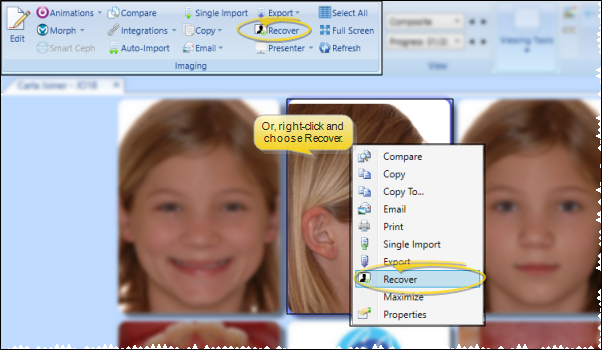
Recover
You can use the Edge Imaging Recover tool to restore a patient image that was previously deleted. See "Recover Deleted Patient Images" for details.
Presenter
Use the Presenter to duplicate whatever is currently being shown on your patient folders, responsible party pages, professional pages, Edge Animations or Edge Imaging screen onto a secondary monitor. This feature is particularly useful for showing patient images to parent and professionals, as well as presenting case, compliance, and treatment progress information. See "Presenter" for details.
Select All
Click Select All from the Imaging section of the Edge Imaging ribbon bar to select all images in the displayed layout for copying, emailing, or exporting.
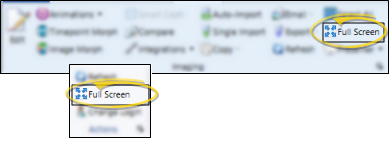
Full Screen Viewing
Use the Full Screen option to fill your entire monitor with the active window, without status bars, ribbon bars, or other distractions. This feature is often useful for presenting progress images to patients and parents, or viewing your Patient Tracker as large as possible in your treatment area. You can either click the Full Screen icon on your ribbon bar, or press Alt+Enter to open full screen mode. To return to normal viewing, press Alt+Enter again, or press your Esc (escape) key. If you are using a touch screen with Edge Imaging, you can double-tap anywhere in the gray area outside of an image to toggle between full screen and normal viewing mode.
Refresh
Click Refresh from the Imaging section of the Edge Imaging ribbon bar to refresh your screen with the latest imaging changes for this patient.

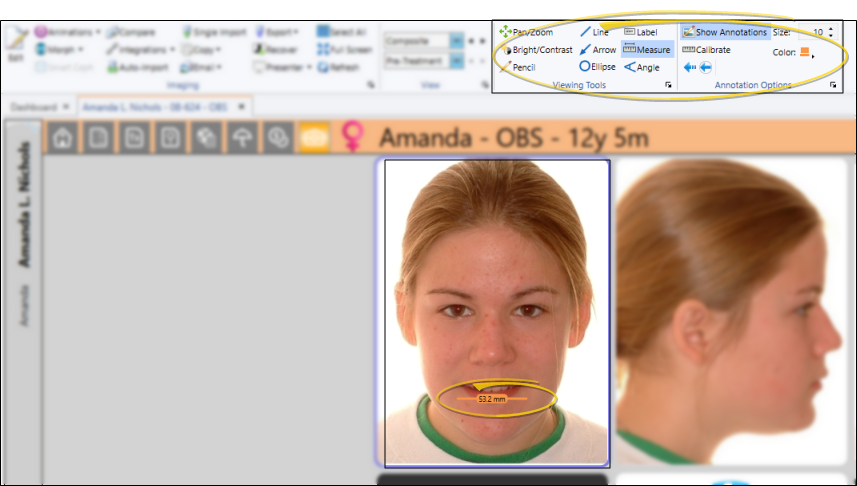
Viewing / Annotation Tools
The Viewing Tools and Annotation Options sections of the Imaging ribbon bar work together to move the image in its window, temporarily change the brightness and contrast, and draw on the image with lines, arrows, measurements, labels, and free-hand illustrations, and labels. These features are especially useful during patient / parent presentations. See "Visually Adjust and Annotate (draw on) Images" for details.
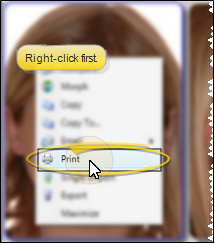
Print Images
Right-click an image and select Print to print the image on any printer available to your workstation. Or, choose Print from the File ribbon bar or the Quick Access toolbar.(See "Print Patient Images & Layouts" for details.) You can also include images in your mail merge documents. (See "Mail Merge Patient Images" for details.)