Patient Treatment Findings
Record patient treatment findings, view current and prior findings, treatment dates, and tooth chart data from the patient folder Findings page.
Get Started
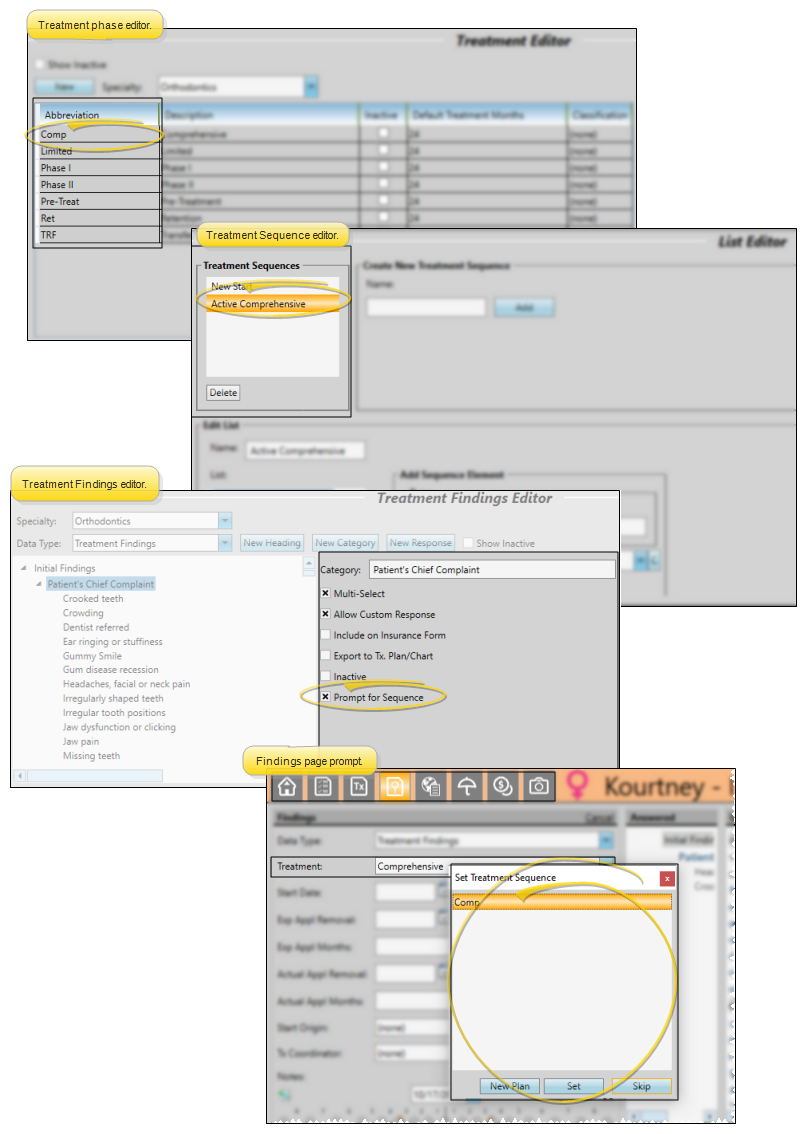
Set Up Findings Categories & Responses - Use the Treatment Findings editor to set up the categories and standard responses to enter into your patients' treatment findings records. You can select the categories that you want to import into the patient's Insurance detail page, choose categories that will prompt you to apply a treatment sequence when a response from that category is added to the patients' findings, and specify which categories allow you to type custom responses into patient records. If you have Edge Cloud, you should set up the editor for each specialty in your practice, See "Treatment Findings Editor" for details.
Set Up Start Origin Descriptions - Use the Start Origin editor to create your list of reasons patients decide to start treatment at your office (i.e. Exam, Insurance Approved, Medical Necessity). The data is collected by treatment phase on the Findings page of the patient folder. You can optionally add standard Gaidge descriptions to this list.See "Start Origin Descriptions" for details.
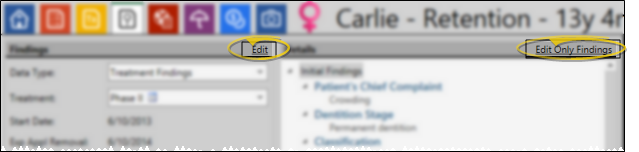
Enable Touch Screen Friendly Editing - (Optional.) Enable the Touch Friendly Tx. Findings option of your Visual User Options to include the Edit Only Findings link on the Findings page of the patient folder.
You can use the Edit Only Findings link to remove the left-hand section of the window (the treatment date, start origin, treatment coordinator and notes section), and provide additional screen space for making the categories and responses larger. This makes it easier to add and edit findings with a touch screen device.
Open the Treatment Findings Page
Open a patient folder and select the Treatment Findings page in the patient folder header.
Treatment Findings Details
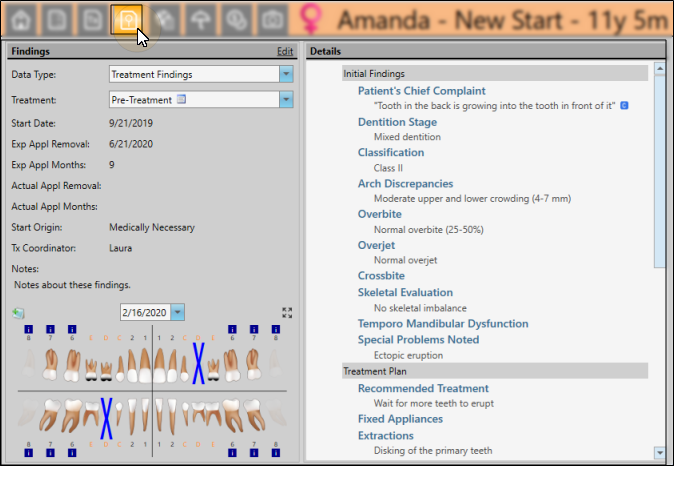
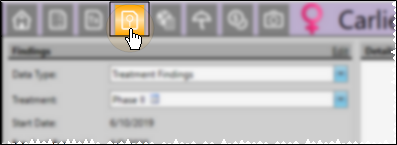
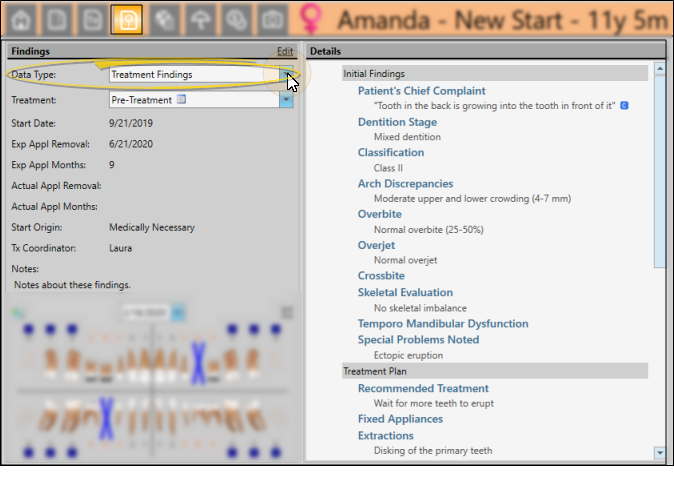
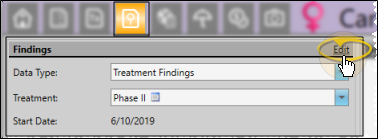
Select Treatment Findings in the Data Type field at the top of the window to view and work with your patients' medical, orthodontic, and dental findings. Your patients' findings are stored by treatment phase to more accurately track treatment progress. Click the Treatment field to select the phase to work with. Only phases that have been previously assigned to the patient are available to you. An icon (i.e. Phase I ) indicates treatment phases that contain responses.
To edit Treatment Findings details, first click the Edit link at the top of the window. When finished, be sure to click Save on the Quick Access toolbar, or press Ctrl+S to save your changes.
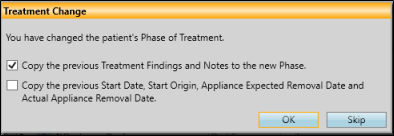
When you update a patient's treatment phase from the Patient Information Panel, you have the opportunity to copy the previous findings, as well as the findings notes, start origin, start date, expected appliance removal date, and actual appliance removal date, to the new treatment phase on the Findings page of the patient folder. If you choose to do this, you will not be prompted to apply a treatment sequence to the new phase. (See "Prompt for Treatment Sequence When Saving Findings Data" for details.)
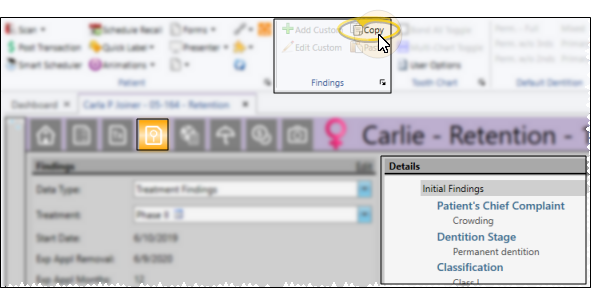
Use the Copy option from the Findings section of the Patient ribbon bar (or press Ctrl-C on your keyboard) to copy the current findings data to your clipboard. You can then paste it into another area of Edge Cloud, or any text editor (i.e. Notepad or Word). Note that this copies all of the patient's findings and responses, not just the currently selected heading or response.
Treatment Dates - Each phase of treatment includes a treatment start date, number of expected treatment months, expected appliance removal date, and finally the actual appliance removal date. Although treatment dates appear on both the patient's Findings page and Treatment Hub page, you can only edit them from the Findings page. You can, however, automate date changes with the Set Start Date and Set Actual Appliance Removal Date workflow activities. See "Workflow Activities" for details.
Start Origin - The Start Origin is the reason or origin of the patient's decision to start this phase of treatment. You can apply the start origin when you first create the contract for this phase of treatment, or change it here as needed. (See "Start Origin Descriptions" for details about managing your list of responses.)
Treatment Coordinator - You can assign a treatment coordinator when you first create the contract for this phase of treatment, or change it here as needed.
Notes - You can enter additional information about this treatment phase in the Notes section at the bottom of the window.
Patient Findings - The patient's findings for the selected treatment phase appear at the right of the window. You can expand and collapse the categories to view the details. To edit Findings details, first click the Edit link at the top of the window. When finished, be sure to click Save on the Quick Access toolbar, or press Ctrl+S to save your changes.
Tell me more about editing details...
Edge Animations and Patient Findings Integration
When you launch Edge Animations for a patient, the Findings section of the Edge Animations Patient tab can automatically list the treatment filmstrips most relevant for them.
To do this, first create an Edge Animations filmstrip for a specific finding, and save the filmstrip in the Edge Animations Treatments list. The name of the filmstrip must EXACTLY MATCH the findings description in your Edge Cloud system. For example, you might create a filmstrip containing videos you'd like to present to a patient with "Class II, division 2 crowding". Once you have everything the way you want it, save that filmstrip to your Treatments tab, with the EXACT name "Class II, division 2 crowding" (or whatever your Edge Cloud findings description is.)
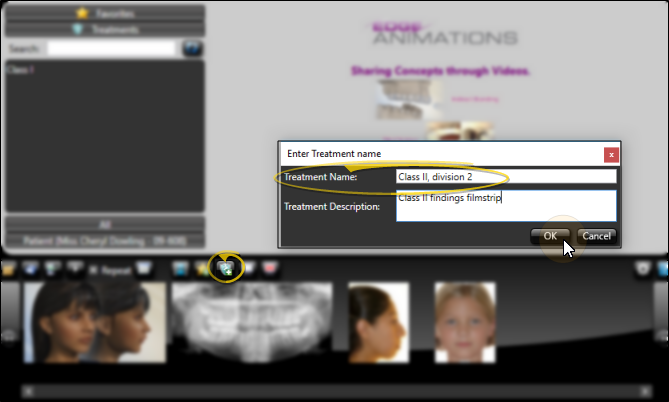
Then, when you launch Edge Animations for a patient with "Class II, division 2 crowding", and click the Patient tab, your filmstrip will appear in the Findings section for you to present to them.

Treatment Sequence / Findings Integration
If you want to be prompted to apply a treatment sequence template when you enter Findings data into the patient folder: 1) The treatment sequence template name must include the entire abbreviation of the treatment phase you want to associate with the template (although the template name and abbreviation do not have to match exactly), and 2) at least one Findings category must be flagged to prompt a treatment sequence. The prompt is only triggered the first time you enter data into a flagged category for each treatment phase. It is not triggered when you use the Treatment Change wizard to copy prior findings to a new phase, or if you edit the Findings page later. See "Prompt for Treatment Sequence When Saving Findings Data" for details.
Enable Edit Mode
Click the Edit link at the top of the window to enable editing mode. If the Touch Friendly Tx. Findings option of your Visual User Options is enabled, an Edit Only Findings link will appear at the top-right of the window. You can use the Edit Only Findings link to remove the left-hand section of the window (the treatment date, start origin, treatment coordinator and notes section), and provide additional screen space for making the categories and responses larger. This makes it easier to add and edit findings with a touch screen device.
Add / Edit Responses
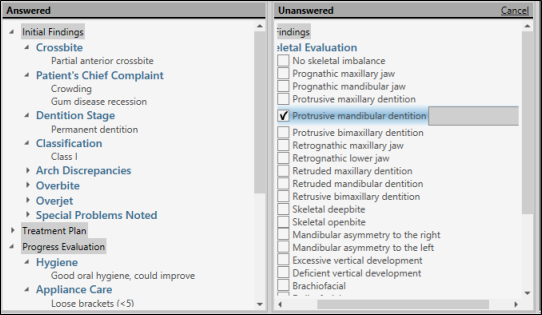
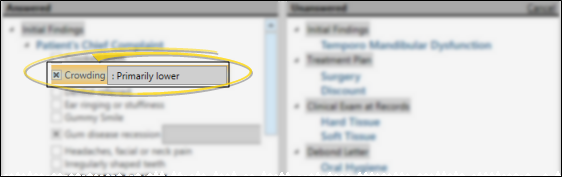
Use the Answered and Unanswered panels on the editing window to record responses for the patient. You can expand and collapse the Answered categories to show / hide the patient's current responses, as well as expand and collapse Unanswered categories to view available responses as needed. As soon as you select a response from a heading in the Unanswered column, that heading immediately moves to the Answered column. This helps you keep track of which information you have already completed for a patient.
Select / Deselect Responses
Click an available response to select it for the patient.
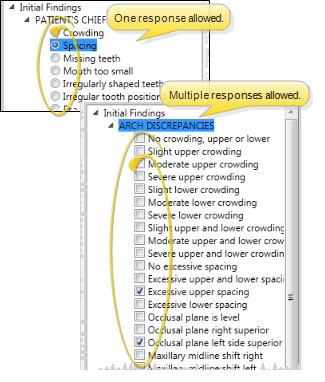
Single Select / Multi-Select - Certain treatment categories (set up in your Findings editor) allow you to select multiple responses, while other categories allow only one response per patient. Responses that are preceded by a square allow multiple responses: Responses that are preceded by a circle allow only one response.
Prompt for Sequence Option - If you want to be prompted to apply a treatment sequence template when you enter Findings data into the patient folder: 1) The treatment sequence template name must include the entire abbreviation of the treatment phase you want to associate with the template (although the template name and abbreviation do not have to match exactly), and 2) at least one Findings category must be flagged to prompt a treatment sequence. The prompt is only triggered the first time you enter data into a flagged category for each treatment phase. It is not triggered when you use the Treatment Change wizard to copy prior findings to a new phase, or if you edit the Findings page later. When the sequence prompt opens, you may: 1) Cancel without selecting a sequence; 2) Assign a new sequence to the latest Treatment Plan, overwriting any current sequence, or ; 3) Create a new Treatment Plan, and assign a sequence to it.
Create a Custom Response
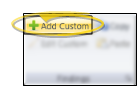
If the listed responses do not fit this patient, click Add Custom in the Findings section of the Patient ribbon bar (or, right-click where you want to add the new response and select Add Custom), and enter your response and layman's description.
Custom responses are flagged with an icon in the patient's Findings results so you can easily identify them.They are not available to any other patient.
This feature is available only if your Findings editor allows it for the selected category.
Edit a Custom Response
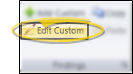
Click a custom response, then click Edit Custom from the Findings section of the Patient ribbon bar (or, right-click the custom response and select Edit Custom). You can then make your changes.
Append a Response
Select the response you want to append, then type your additional information in the text box. Appended responses are unique to this patient.
Remove Responses
To clear all of the patient's answers for a specific category, right-click that category heading, then select Clear Responses.
![]()
Misc. Information Details
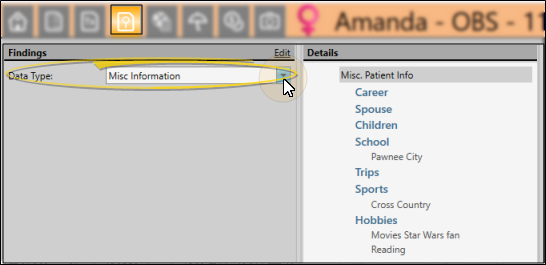
Select Misc. Information in the Data Type field at the top of the window to view and work with non-medical information you want to track for your patients. The additional information appears at the right of the window. You can expand and collapse the categories to view the details for the patient. The information is not tracked by treatment phase: The same information appears on this screen regardless of the currently selected treatment phase. To edit Miscellaneous Information details, first click the Edit link at the top of the window. When finished, be sure to click Save on the Quick Access toolbar, or press Ctrl+S to save your changes.
Tell me more about editing details...
Enable Edit Mode
Click the Edit link at the top of the window to enable editing mode. If the Touch Friendly Tx. Findings option of your Visual User Options is enabled, an Edit Only Findings link will appear at the top-right of the window. You can use the Edit Only Findings link to remove the left-hand section of the window (the treatment date, start origin, treatment coordinator and notes section), and provide additional screen space for making the categories and responses larger. This makes it easier to add and edit findings with a touch screen device.
Add / Edit Responses
Use the Answered and Unanswered panels on the editing window to record responses for the patient. You can expand and collapse the Answered categories to show / hide the patient's current responses, as well as expand and collapse Unanswered categories to view available responses as needed. As soon as you select a response from a heading in the Unanswered column, that heading immediately moves to the Answered column. This helps you keep track of which information you have already completed for a patient.
Select / Deselect Responses
Click an available response to select it for the patient.
Single Select / Multi-Select - Certain treatment categories (set up in your Findings editor) allow you to select multiple responses, while other categories allow only one response per patient. Responses that are preceded by a square allow multiple responses: Responses that are preceded by a circle allow only one response.
Prompt for Sequence Option - If you want to be prompted to apply a treatment sequence template when you enter Findings data into the patient folder: 1) The treatment sequence template name must include the entire abbreviation of the treatment phase you want to associate with the template (although the template name and abbreviation do not have to match exactly), and 2) at least one Findings category must be flagged to prompt a treatment sequence. The prompt is only triggered the first time you enter data into a flagged category for each treatment phase. It is not triggered when you use the Treatment Change wizard to copy prior findings to a new phase, or if you edit the Findings page later. When the sequence prompt opens, you may: 1) Cancel without selecting a sequence; 2) Assign a new sequence to the latest Treatment Plan, overwriting any current sequence, or ; 3) Create a new Treatment Plan, and assign a sequence to it.
Create a Custom Response
If the listed responses do not fit this patient, click Add Custom in the Findings section of the Patient ribbon bar (or, right-click where you want to add the new response and select Add Custom), and enter your response and layman's description.
Custom responses are flagged with an icon in the patient's Findings results so you can easily identify them.They are not available to any other patient.
This feature is available only if your Findings editor allows it for the selected category.
Edit a Custom Response
Click a custom response, then click Edit Custom from the Findings section of the Patient ribbon bar (or, right-click the custom response and select Edit Custom). You can then make your changes.
Append a Response
Select the response you want to append, then type your additional information in the text box. Appended responses are unique to this patient.
Remove Responses
To clear all of the patient's answers for a specific category, right-click that category heading, then select Clear Responses.
![]()
Findings History
Select Findings History in the Data Type field at the top of the window to view a side-by-side comparison of the patient's treatment findings so far. You can click an image link from the Records section of the history to open the patient's Imaging page, with the selected image maximized. Because this is historical information, you cannot edit responses from this window.
You can also view the findings history from the Findings panel of the patient folder Home page. See "Patient Findings Panel" for details.

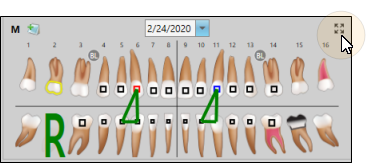
Tooth Chart
To expand the tooth chart to fill the patient folder window, click the Expand button in the upper-right corner of the chart. Click the button again to minimize the chart. You can use the date drop down to view a different tooth chart, click the M in the upper-left corner to view and edit whole mouth procedures, and click the Notes icon to review and add notes to the tooth chart. To make additional changes, first click the Edit link at the top of the window. When finished, be sure to click Save on the Quick Access toolbar, or press Ctrl+S to save your changes. See "Patient Tooth Chart" for details. about how to use the tooth chart.
Add Findings to Treatment Charts/Plans, Merge Documents, and Insurance Forms
Import Findings Into Treatment Chart / Plan - Use the Import Findings tool to add data from the Findings page of a patient folder to a treatment chart or treatment plan record. To function, you need a treatment chart style column with either the Text Only or List and Text column type. See "Add Findings to Treatment Plan / Chart" for details.
Add Findings to Mail Merge Documents - You can insert both the short and long descriptions of your patients' treatment findings and miscellaneous information from the Findings page of the patient folder into your mail merge documents, and print them in either list or paragraph form. See "Mail Merge Findings Variables" for details.
Add Findings to Insurance Forms - You can import selected patient findings for the current treatment phase into the Insurance page of the patient folder, to be included on insurance forms. See "Patient Insurance Page" for details.
Edge Animations and Patient Findings Integration
When you launch Edge Animations for a patient, the Findings section of the Edge Animations Patient tab can automatically list the treatment filmstrips most relevant for them.
To do this, first create an Edge Animations filmstrip for a specific finding, and save the filmstrip in the Edge Animations Treatments list. The name of the filmstrip must EXACTLY MATCH the findings description in your Edge Cloud system. For example, you might create a filmstrip containing videos you'd like to present to a patient with "Class II, division 2 crowding". Once you have everything the way you want it, save that filmstrip to your Treatments tab, with the EXACT name "Class II, division 2 crowding" (or whatever your Edge Cloud findings description is.)
Then, when you launch Edge Animations for a patient with "Class II, division 2 crowding", and click the Patient tab, your filmstrip will appear in the Findings section for you to present to them.
Findings Reports
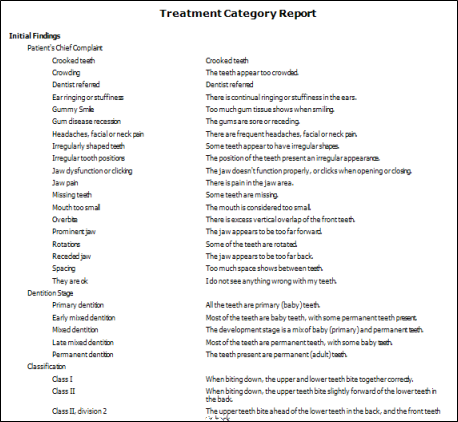
Treatment Category Report
Run a Treatment Category report to obtain a list of the active headings, categories, and responses you have available for inputting into the Findings page of your patient folders. The report includes the headings, categories, short responses, and long descriptions in your Treatment Findings editor. Only active records are included in the report: Any items flagged Inactive in the editor are omitted. If you have Edge Specialist, the records for both orthodontics and pediatric dentistry are included in the report. See "Treatment Findings Category Report" for details.
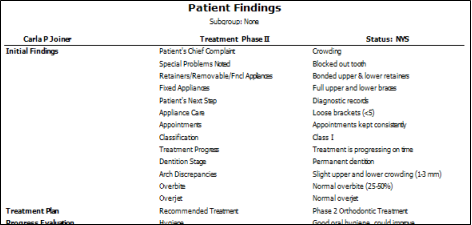
Patient Findings Report
Run the Patient Findings report to obtain the data you have recorded on the Findings page of the patient folder for the patient's current treatment phase. You can generate the report for an individual patient or a subgroup, choose one or all of your practice specialties if you have Edge Specialist, and select which findings to include. See "Patient Findings Report" for details.
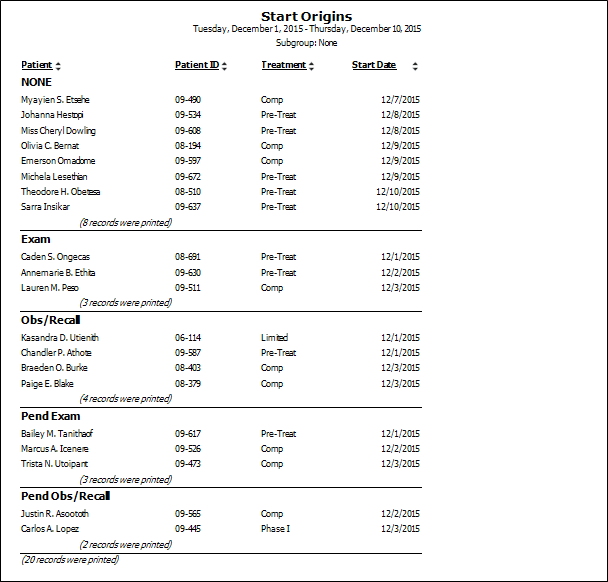
Start Origin Report
Run the Start Origin report to obtain a list of patients for any range of start dates, grouped by Start Origin. You may include all start origin descriptions, or choose to include only specific descriptions on the report. Each section of the report lists the patient names and ID numbers, as well as the treatment phases and start dates for that start origin. Because the report looks at all treatment phase start dates within the range you specify, not just your patients' current start dates, patients may be included in the report multiple times. See "Start Origin Report" for details.