Edge Cloud 7.1
Welcome to your Edge Cloud 7.1 enhancements! This release brings major integration updates including EMV payment terminal support, improved DDX integration, and the new OrthoFi integration.
Global Payments Reintegration
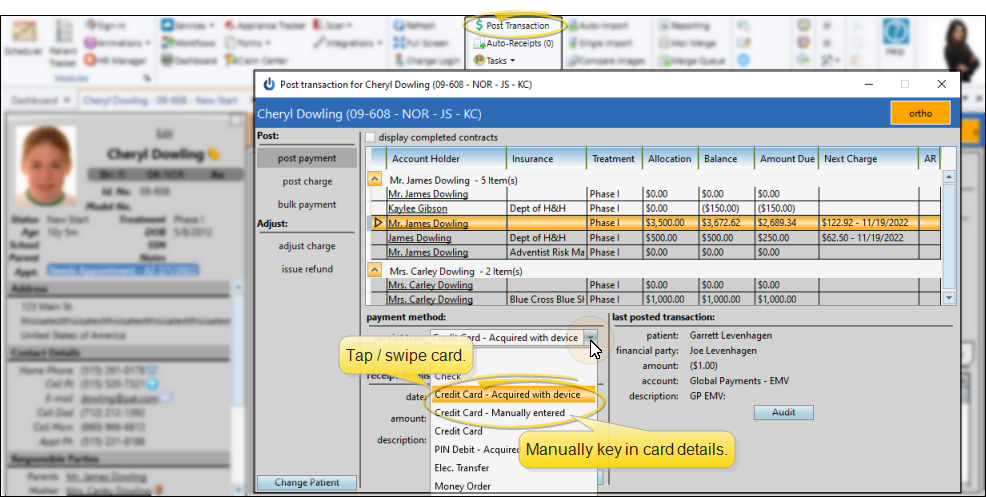
Our Edge Cloud / Global Payments Integrated integration now supports payment terminals with state-of-the-art security and EMV technology for your patients' swipe, tap, and keyed credit and debit card payments. The updated technology also includes the Decline Minimizer feature, which attempts to update a card on file automatically when it expires or the number changes.
Setup Steps
While customers already using Global Payments Integrated with Edge Cloud do not need to do anything extra to continue to process credit card payments, in order to use EMV-enabled payment terminals, everyone will need to complete a few steps:
To use EMV-enabled payment terminals:
- Upgrade your computers to Edge Cloud 7.1
- If you haven't used Global Payments Integrated before, set up your account credentials in your Edge Cloud Payment Accounts editor
- Obtain EMV-enabled devices from Global Payments Integrated and enter the device IDs in your Edge Cloud Payment Accounts editor (You will need to edit a payment account assigned to Global Payments Integrated in order to enter your EMV devices)
- Use your Edge Cloud User Options to enable the appropriate EMV device(s) at each computer that will post credit/debit card payments
Once set up, you can use EMV-enabled devices as well as manual entry to process credit and debit card transactions within your office, over the phone, and as auto receipts. When posting transactions:
- Select Credit Card - Acquired with Device when tapping/swiping the physical credit or debit card
- Select Credit Card - Manually Entered when keying in card details or processing auto receipts
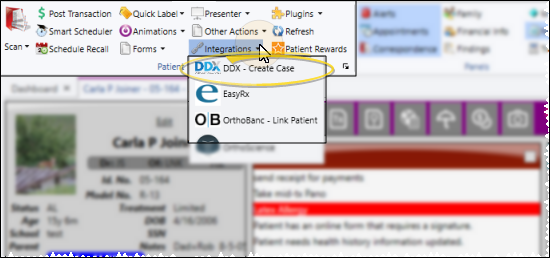
Improved DDX Integration
You can now integrate your patients' DDX cases with their Edge Cloud patient folders. With the integration enabled in your System Integrations editor:
- All Edge Cloud operators can see the DDX status as patient visual tags
- Use the Filters option in the Treatment Chart ribbon bar to show/hide DDX cases in the patient's Edge Cloud Treatment Chart
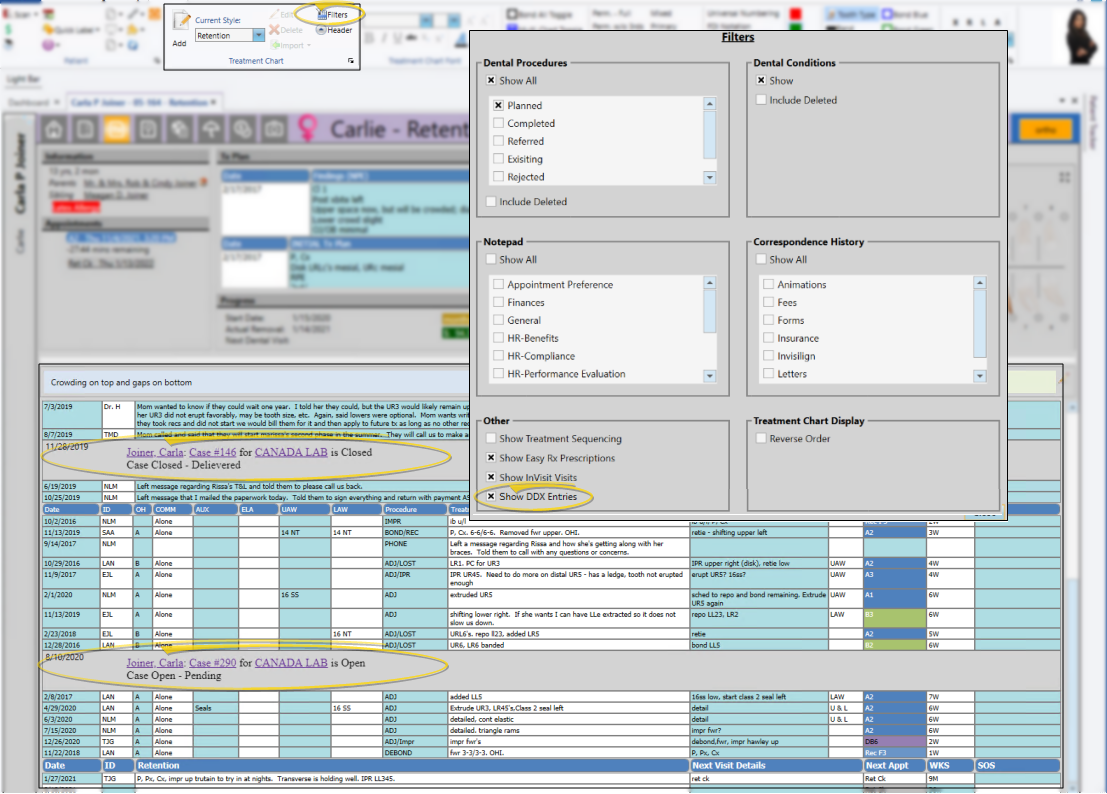
Individual Edge Cloud operators can add the DDX integration to their Integrations User Options to access and create DDX cases for patients. With a patient folder open, select Integrations > DDX from the Patient ribbon bar.
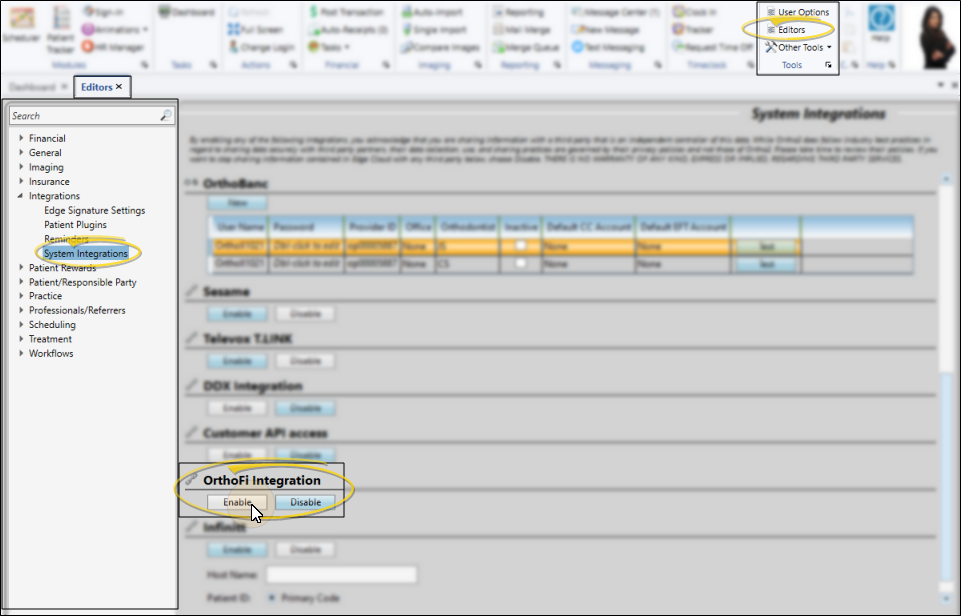
OrthoFi Integration
You can now integrate your patients' OrthoFi payment plans with their Edge Cloud patient accounts. To activate this integration:
- Go to the System Integrations editor
- Select Enable in the OrthoFi section
- Contact the OrthoFi integrations team at integrationsteam@orthofi.com to continue the onboarding process
General Feature Updates
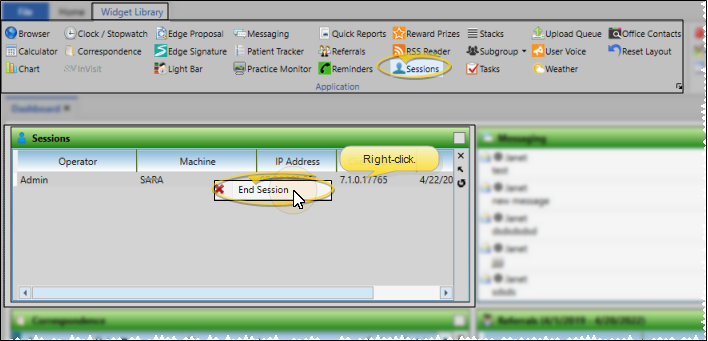
Manually End Edge Cloud Sessions
When an operator logs out of Edge Cloud, the session is stopped on that computer, freeing up an Edge Cloud license. Occasionally, a computer or operator may get "stuck" and the session needs to be stopped manually.
To end a session manually:
- Open the Sessions widget
- Right-click the session you want to end
- Select End Session
After a buffer of 30 seconds, the session will be ended.
Only operators with full rights to the End Sessions property of the Practice Administration security group can end sessions.
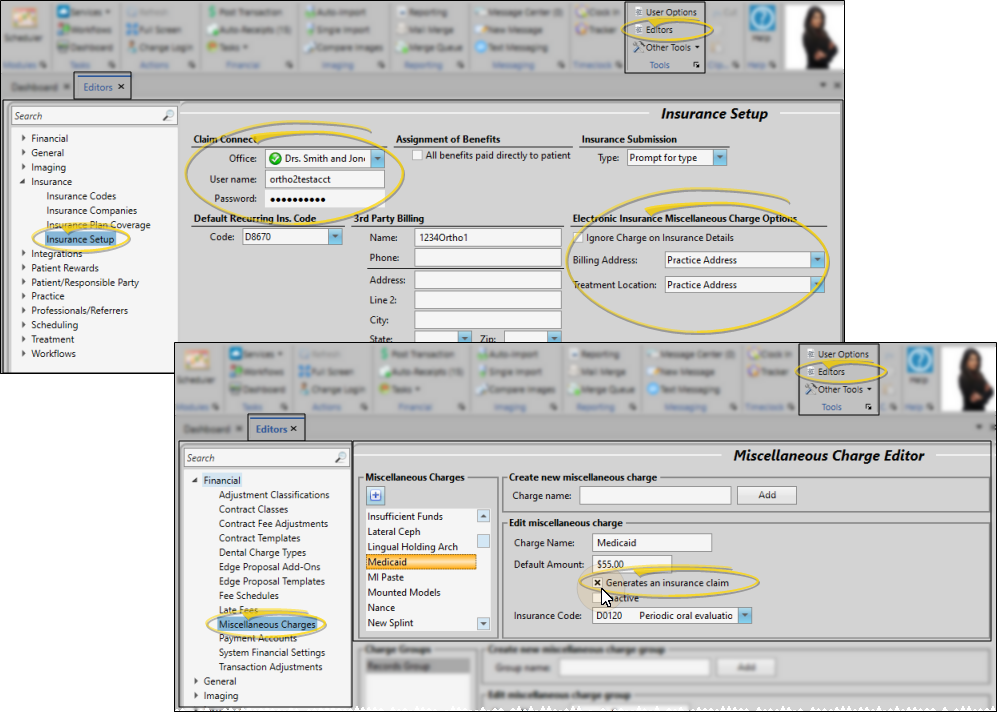
Auto-Generate Miscellaneous Charge Insurance Claims
Edge Cloud can now auto-generate electronic insurance claims whenever you post specific miscellaneous charges. This feature is particularly useful for offices that accept Medicaid and other pay-for-service insurance, especially when coupled with a workflow that automatically posts the miscellaneous charge when a Medicaid patient has been seen for an appointment.
This feature only functions for miscellaneous charges posted to offices set up to use the Claim Connect / DentalXChange electronic insurance clearinghouse.
To get started:
- Go to the Insurance Setup editor and supply the details for auto-generated miscellaneous charge insurance claims
- Confirm your Claim Connect credentials for each office
- Use your Miscellaneous Charge editor to flag the charges you want to automatically generate electronic claims
- Confirm the charge amount and insurance code for those charges
- When you post a miscellaneous charge that is flagged to auto-generate insurance, Edge Cloud will use these settings to create an electronic insurance claim
Country-Specific Formatting
Address and phone number formatting throughout your Edge Cloud system are now controlled by the country or countries in which you practice. If you work in multiple countries (e.g., both the United States and Canada), you can select your primary country in the Practice editor as the default. Then select the appropriate country for individual offices, professionals, insurance companies, patients, and more as needed.
The address and phone number fields will automatically be formatted for the assigned country. For example, an office assigned to “Canada” will have fields for “Province” and “Postal Code”, while an office assigned to “United States” will have “State” and “Zip Code” fields. Practices that work in only one country will not see a “Countries” option in their Practice editor, but your address and phone number fields will be formatted for the country Ortho2 has on file.
The countries available to you are determined by the information Ortho2 has on file for your practice. If you need to add or change your country options, contact your Ortho2 Regional Manager.
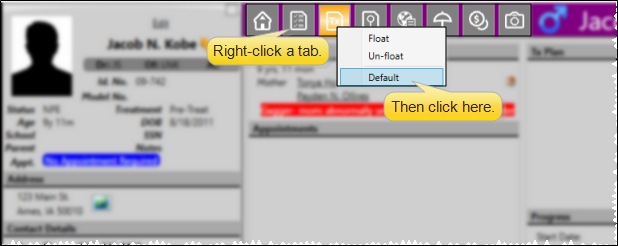
Default Patient Folder Page
Each Edge Cloud operator can now select which page they see when they first open a patient folder. To set up your default:
- Open any patient folder
- Right-click the tab you want to open first
- Select the Default option
This page will be your default whenever you open a patient folder on any Edge Cloud computer you log into.
Dismiss Alert Popup With Keyboard Shortcut
When a patient alert pops onto your screen, you can now press the Enter key to dismiss it. You can also still click on the alert box to dismiss it, or click the Edit link to open the alert editor for that patient.
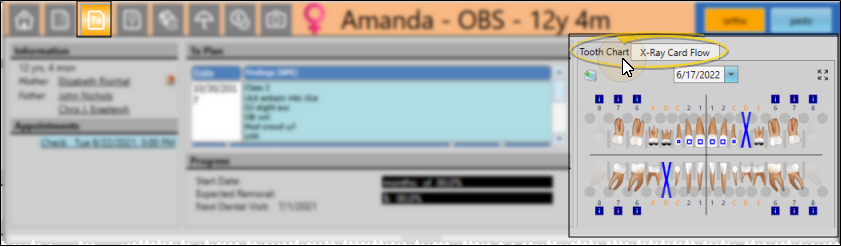
Edge Cloud Remembers Tooth Chart / Image Tab Choice
When you display the tooth chart and patient images as "stacked" in the Treatment Hub header, Edge Cloud now remembers which tab you were viewing when you exit and re-open a patient folder. Previously, the Treatment Hub would revert to showing the tooth chart. Choose whether to display the tooth chart/image tab as "stacked" (as opposed to side-by-side) in your Treatment Hub User Options.
Mail Merge AutoSave Issue Resolved
In certain circumstances, Word would autosave a document that was merged for a patient as the mail merge template, making the template unsuitable for merging with other patients. This issue has been resolved. If you find a mail merge document has become corrupt or otherwise unusable, you can use the Merge Document History feature to roll back the document to a usable state.
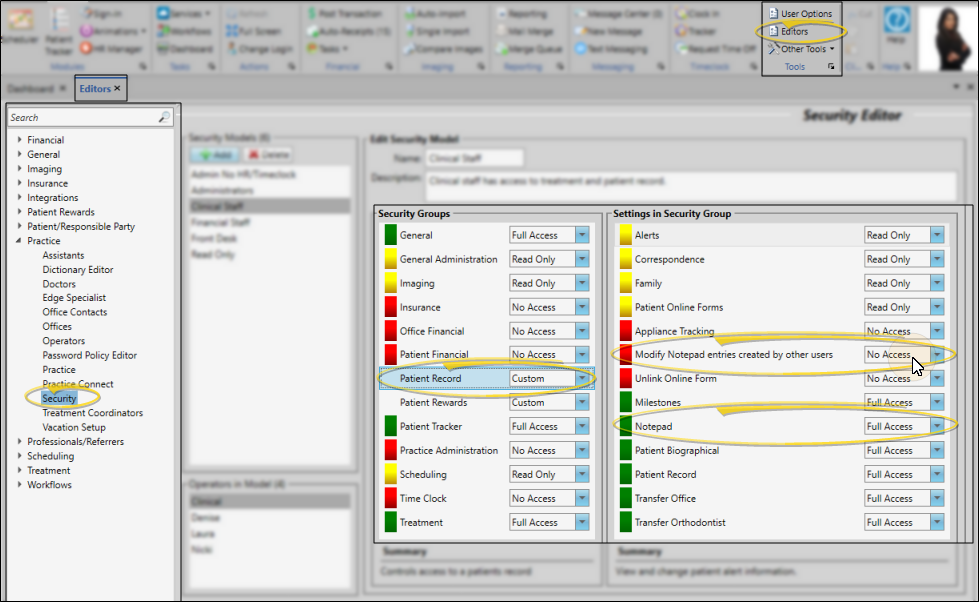
Notepad Security Can Restrict Editing
A new security setting can restrict Edge Cloud users to editing/deleting only notepad entries they created themselves.
To set up this option:
- Open your Security editor and select a security model
- Choose the Patient Record security group
- If Notepad is set to Full Access, you can set Modify Notepad Entries Created by Other Users to No Access
The user will still be able to create notepad entries, but only edit and delete entries they created.
Offices Alphabetized
Your list of offices is now alphabetized throughout your Edge Cloud system. Previously, offices were sometimes listed in random order.
Subgroup Smart Values Enhanced
Several new smart values have been added to your subgrouping options:
- 6 months ago
- 6 months from now
- One year ago
- One year from now
Subgroup Widget Can Display Patient Dismissal Date
You can now display the Patient Dismissal Date as a column in your subgroup widget. Open the widget settings window and enable the Patient Dismissal Date option in the Milestones section.
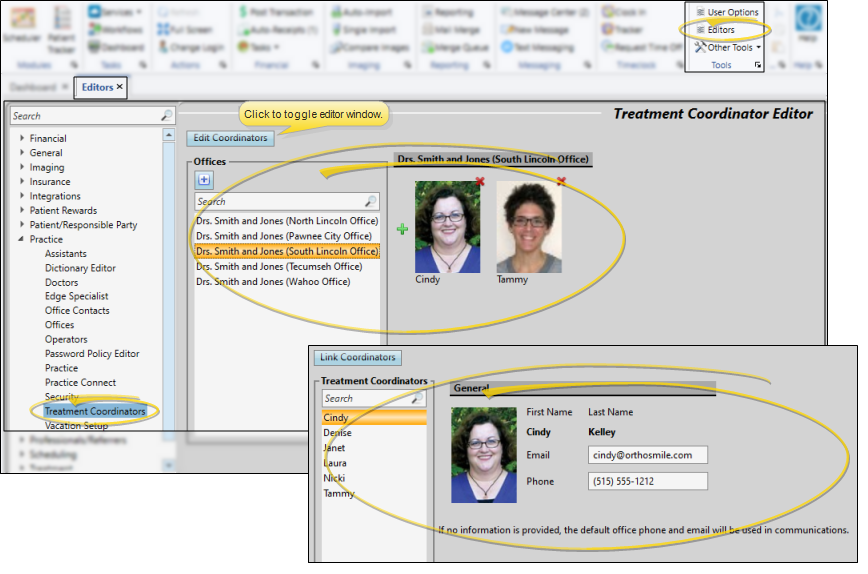
Treatment Coordinator Editor Redesigned
The Treatment Coordinator editor has been redesigned to better display the coordinators assigned to offices and to allow for individual coordinator email addresses and phone numbers.
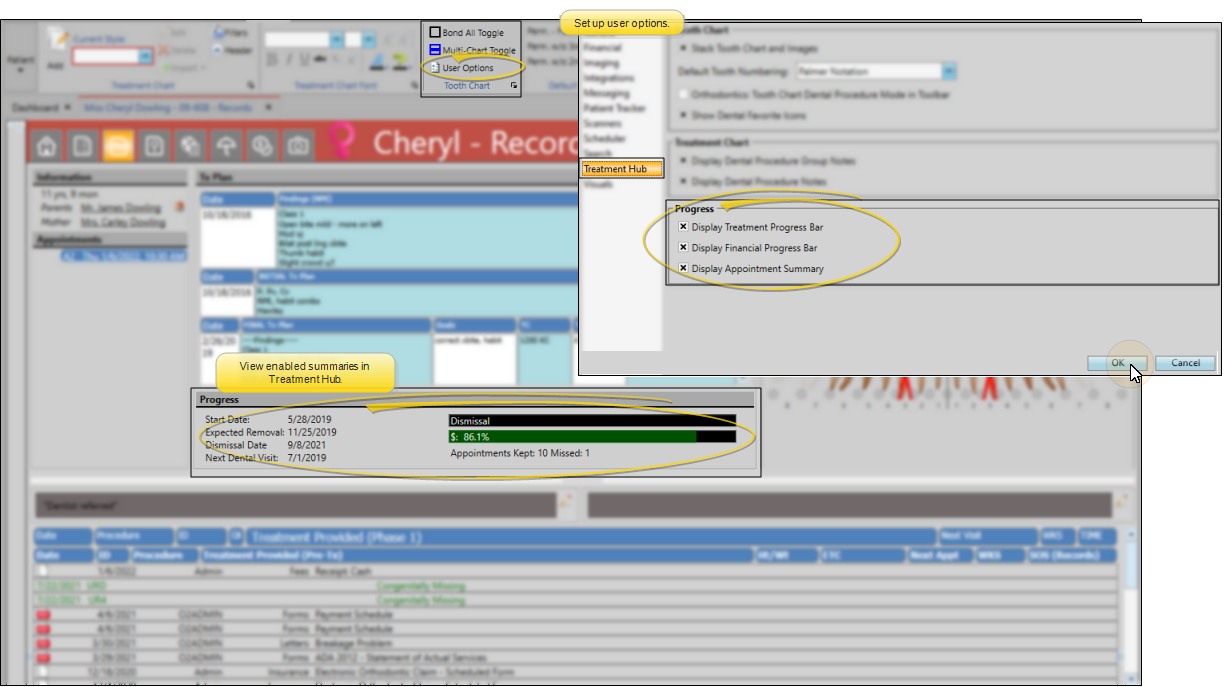
Treatment Hub Can Show Missed / Kept Appointments
The Treatment Hub can now include a summary of the appointments the patient has kept and missed for the current treatment phase. Hover over the summary to see the appointment details.
To enable/disable: Open your User Options window, select the Treatment Hub tab, and toggle the Appointments Kept / Missed Summary option.
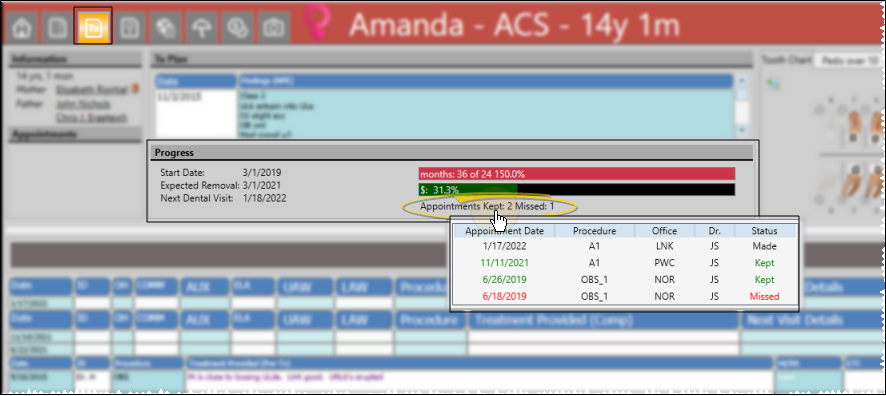
Treatment Hub Progress Bars Optional
You can now control which progress summaries you see on your Treatment Hub, including the new Appointments Kept/Missed summary. Open your User Options window and select the Treatment Hub tab to show/hide progress summaries in the Progress section.
Zip Code Editor Prevents Duplicates
When you first update to this release, Edge Cloud scans and removes duplicate zip code entries. You will no longer be able to create duplicate entries in your Zip Code editor. This ensures that patients and responsible parties living within a zip code are all linked to the same zip code record.
Integration Enhancements
Dolphin Imaging Can Link to Secondary ID
If you use the Edge Cloud / Dolphin Imaging integration, you can now link images in Dolphin with your patients' Edge Cloud secondary ID. Previously, records could be linked only with the primary ID number. This enhancement is particularly beneficial for offices that also use the new Edge Cloud / Infinitt PACS Imaging System integration, and you enter Edge Cloud secondary IDs in the format required by Infinitt. To set up your Dolphin Imaging integration, go to the Integrations tab of your User Options.
If you use both the Dolphin Imaging and Infinitt PACS Imaging System integrations with Edge Cloud, ensure both integrations are set up to use the same patient ID code type.
Infinitt Integration Available
Offices that use the Infinitt PACS Imaging System can now open patient imaging pages directly from Edge Cloud.
To set up:
- Open the Edge Cloud System Integrations editor
- Choose to enable Infinitt
Once configured, open an Edge Cloud patient folder and select Integrations > Infinitt from the Patient ribbon bar to open the Infinitt website to that patient's record.
If you use both the Dolphin Imaging and Infinitt PACS Imaging System integrations with Edge Cloud, ensure both integrations are set up to use the same patient ID code type.
New York Medicaid Export
Use the New York Medicaid Export integration to compile patient data in the format required by WCS NYS Managed Care (WCS) software, which facilitates filing your New York Medicaid claims. Once the integration compiles the data, simply upload the file to WCS for processing.
New and Updated Reports
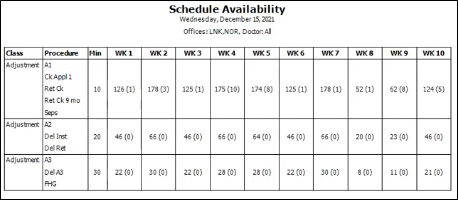
Schedule Availability Report
Run the new Schedule Availability report to see how many weekly appointment openings you have for up to 10 weeks from the date you select, based on your Scheduler template classifications.
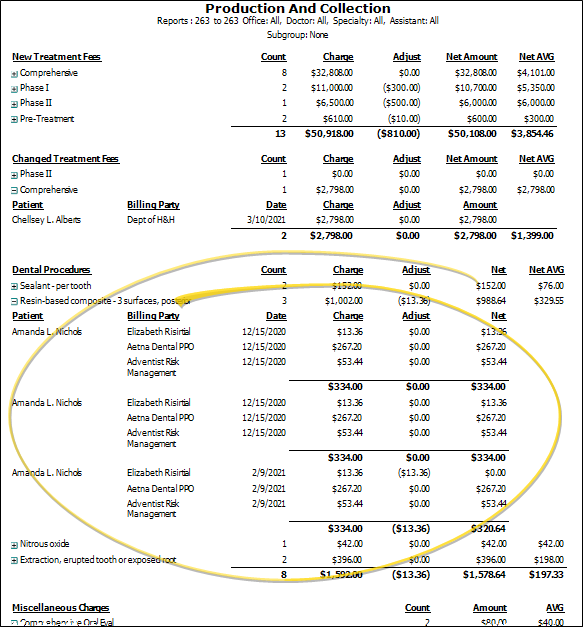
Production and Collection Report Updates
The Dental Procedures section of the Production and Collection report has been updated to include the patient name and date on dental charge adjustments, and to fix the charge and net columns.
Scheduling Enhancements
Appointment Length Lock Option
You can now prevent Edge Cloud operators from changing the appointment length as they schedule or edit a patient appointment. This feature has two levels:
- Security editor: Prevent operators from changing the length of any appointment
- Appointment Procedure/Type editor: Prevent anyone from changing the length of individual appointment procedure types, regardless of Security editor settings
If you do not have access to changing the appointment length, that field will be dimmed when you schedule or edit a patient appointment.
Appointment Type Creation / Deletion Security
You can now prevent Edge Cloud operators from creating and deleting appointment types while allowing them to modify appointment type details such as colors and workflows. This ensures your list of appointment types remains stable practice-wide while allowing for updated scheduling protocols as they arise. First, be sure the Scheduling section of your Security editor allows/prevents operators from accessing all Scheduling editors (which includes the Appointment Procedure / Type editor). Then, for those operators that have access to Scheduling editors, choose to allow / prevent them from creating and deleting appointment types.
Office Filter for Scheduler Month-View
When viewing your Scheduler in Month-View, you can now filter which office(s) to include so you can more easily see statistics and apply templates that are relevant only for your location. This feature is especially useful for practices with a large number of offices.
Setup: Every chair of your Scheduler templates must be classified by office. Go to the Scheduler Templates editor, choose a template, and click Edit Grid Template. Use the Modify Chair option to assign an office to each chair of the template. (Most often, it is best to assign all the chairs of a template to the same office, and have at least one template per office.) Be sure to save your changes. To apply your new office assignments to all instances of the template that are already in use, click Reclassify Chairs from the Scheduler Templates editor screen, and select the Office option.
When viewing your Scheduler in Month-View, use the Office Filter setting at the right of the screen to select one or more offices. Your Month-View screen will include only templates with all chairs assigned to the selected office(s) you selected, and you will be able to apply only those templates to the schedule. To include templates that have at least one, but not all, chairs assigned to your selected office(s), you must also choose the “Multi-Office” option.
To find templates with chairs that have not been assigned to an office, choose the "Unassigned" option in your Office Filter. Then right-click a date in your Month-View schedule to see a list of the unassigned templates.
Recall Date Auto-Set Feature Improved
The recall appointment auto-set feature has been enhanced to better choose the next recall date for the intervals of “month” or “week”. When the interval is “month”, and the current date is the last day of the month (i.e. January 31), Edge Cloud will count the number of months, and choose the last day of that month (i.e. February 28 or June 30) as the next recall date. Also, if you select an auto-set interval of “week”, the Day field is is not taken into account, and is hidden from the screen. When using the “week” interval, Edge Cloud simply counts the number of weeks from the current date.
Edge Imaging Enhancements
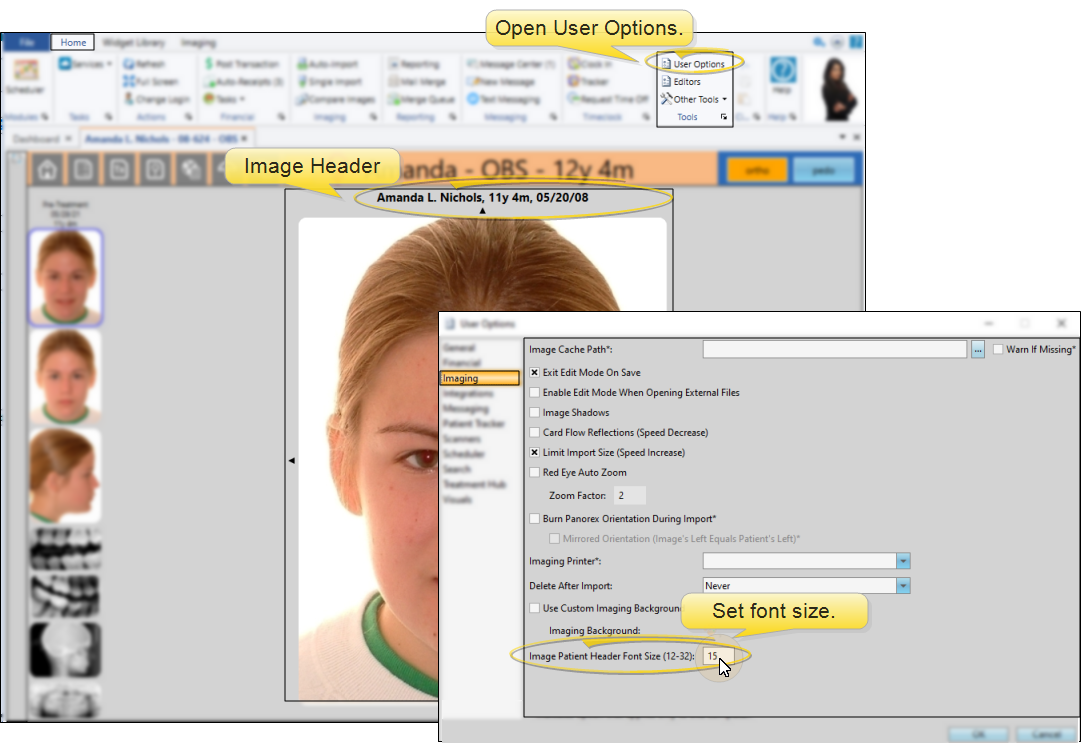
Change Image Header Font Size
You can now use your Imaging User Options to adjust the font size of the header that appears at the top of your Index layout and individual images that you maximize. Your setting is specific to you: Other Edge Cloud users can have a different font size selected. To adjust the font size, open User Options from the Tools section of the Home ribbon bar, and select the Imaging option. You can set the image header font size anywhere between 12 and 32. If a patient Imaging page is open when you change the font size, you will need to refresh the page to see the changes.
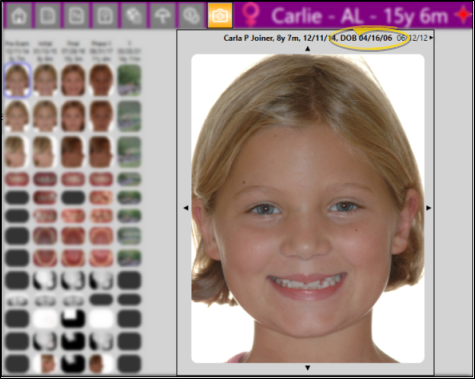
Display DOB Caption on Images
If you choose to include the patient's date of birth on your image captions, the date will now be preceded by "DOB". Use the Image Caption editor to set up your image captions and your Image Layouts editor to set up where captions appear.
Edge Specialist Enhancements
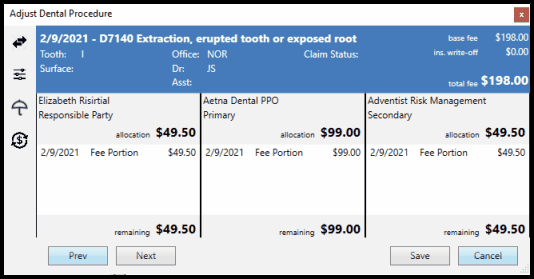
Dental Procedure Adjustments Improved
Use the Adjust Dental Procedure window to make changes to the base fee, discounts, allocations, and insurance write-offs for completed pediatric dentistry procedures. With this updated tool, you are in full control of the allocation of your dental procedure fees, including how the fees appear in your patient ledger and on your insurance forms.
Edit Planned Procedure Office from Treatment Hub
You can now edit the office location for planned dental procedures from the patient's Treatment Hub. Previously, only the doctor and assistant could be edited.
To edit the office:
- Open the patient's Treatment Hub page
- Right-click or double-click to edit the procedure
- Select the office to assign
- If the procedure is in a group, you will need to edit additional procedures individually. You can click Next at the bottom of the editing window to advance to the next procedure in the group
- Click Ok to save and close
Changes you make to dental procedure details from the Treatment Hub remain in the Treatment Hub only; they are not reflected in the Scheduler appointment or any appointment reports. This allows you to assign individual procedures within a single appointment to specific doctors, assistants, or offices while keeping the main treatment/billing provider the same in the Scheduler.
Manually Close Insurance Claims
In normal use, insurance claims are closed when you process them as paid. However, you can now manually close pediatric dentistry insurance claims and the associated dental procedures, even if the claim has not been paid. You might do this, for example, if you accidentally submit a claim to the wrong insurance company, or for the wrong patient, or when you first start using Edge Specialist and need to reconcile paid dental procedures against their submitted insurance claims.
You cannot re-open closed insurance claims or dental procedures for payment. Once closed, any remaining fee will need to be added to another insurance, responsible party, or write-off. If you later receive an insurance payment for a closed procedure, you will need to create and submit a new paper claim, then post the transaction.
New Links for Updating Insurance Claim Providers
Billing and Treatment Provider links have been added to the Edit Insurance Claim window for easy updates to pending insurance claims. From the Claims or Procedures section of the patient's pediatric dentistry Insurance page, open the pending claim. From the Edit Insurance Claim window, select the edit icon next to the Billing or Treatment Provider to open an editing window.
Use the Select Assistant, Select Doctor, or Select Office link to choose a new provider - details will auto-fill from the respective Edge Cloud editor. You can also edit individual fields manually (edited information is saved for this insurance claim only).
Recalculate Dental Procedure Fees
You can now recalculate pending dental procedure fees with one click. When a patient has pending dental procedures and you make changes to their billing line, insurance plan, or fee schedule, you can easily recalculate the associated fees.
To recalculate:
- Go to the patient's pediatric dentistry Treatment Hub
- Right-click or double-click the pending dental procedure to edit it
- Select the Fees icon
- Click the Recalculate Fees button
- Click Save
You can recalculate fees for individual dental procedures, or right-click a procedure group heading to recalculate fees for all procedures in that group. (If no fee changes are available, clicking the Recalculate button will not make any changes to the planned fee.)