Timesheet Reports
Timesheets; Timesheet Edits; Timesheets - Daily; Timesheets - Daily Overtime; Timesheets - Summary
Run a Timesheet report to obtain the details about when employees clocked in and out, as well as the total hours worked, for any range of dates. All timesheet reports, except Timesheet Edits, can be run for selected employees or all employees, and can optionally include inactive employee records.
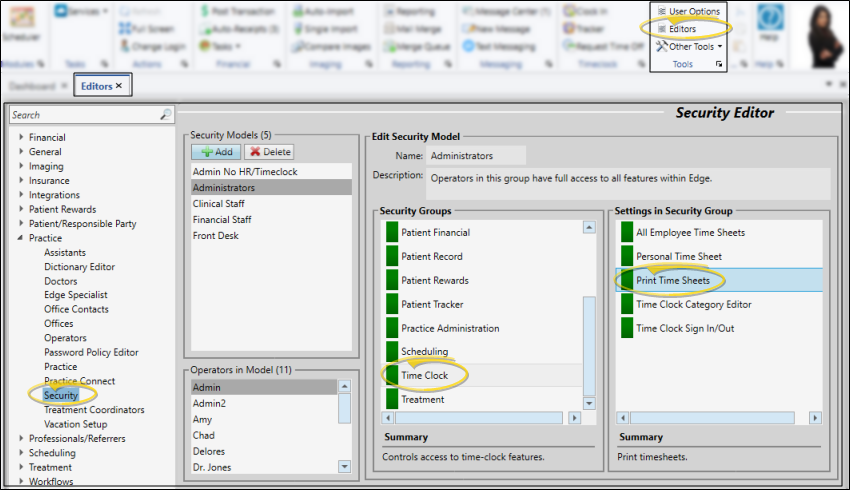
Timesheet Report Security
You must have full access to the Print Time Sheets setting in the Timeclock security group of your Security editor in order to open and print any timesheet report.
Report Data Source
This report gets its data from time stamps clocked by your employees, and the Timeclock Tracker.
Time Calculations
Timeclock reports calculate the amount of time as of now if an employee is still clocked in when the report is generated. However, if an employee clocked in on a previous day, and the date range cuts off before the clock-out date, the time is calculated as of midnight of the last day of the date range.
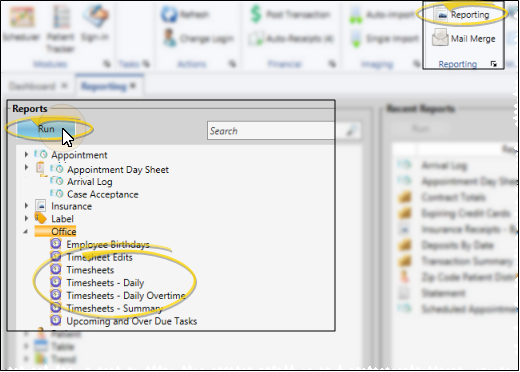
Open a Timesheet Report
Select Reporting from the Reporting section of the Home ribbon bar. Then from the Office section, open the Timesheet report you want to run, listed below. You can double-click the report name, or click Run at the top of the window to continue. (You can also use the Search field to find the report you want to work with.) You might also be able to run this report or form from your Recent Reports or Quick Reports list. See "Run Edge Cloud Reports" for details.
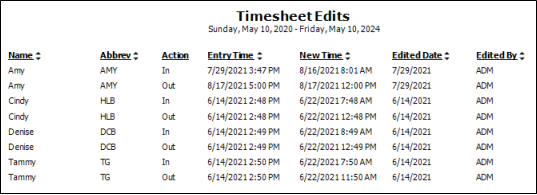
Timesheet Edits
The Timesheet Edits report lists all of the time stamps within the specified date range that were edited. The report includes the original and new time stamp data, as well as the date and operator that made the change.
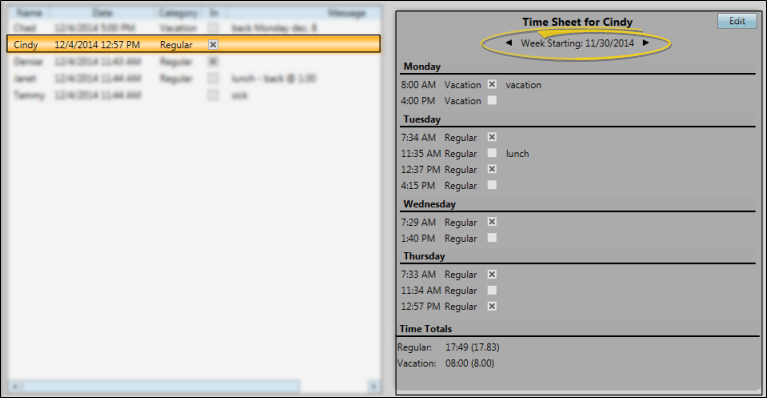
Timesheets
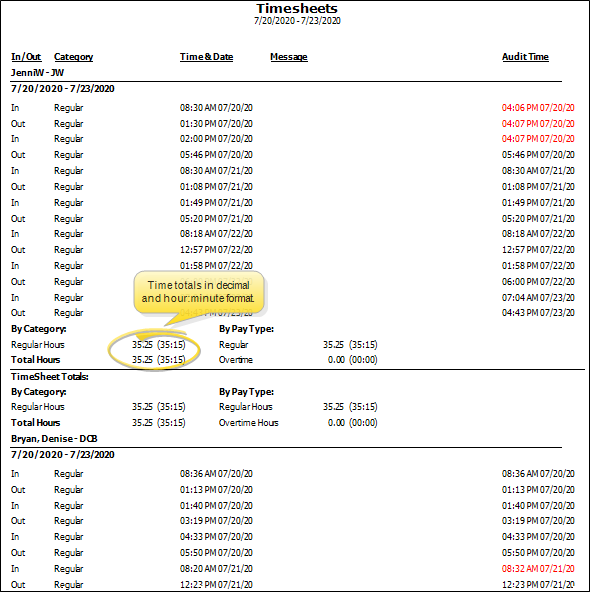
The Timesheets report lists all the time stamps in the date range for each employee selected, and the total hours worked during that time, in both decimal and hour:minute format. The category column indicates whether the time is regular, vacation, or sick time. You can optionally include a page break between employees, use the Audit option to compare time stamp entries to the actual time and date each stamp was created, and use the Show Overtime option to include the total amount of regular hours considered to be overtime. When this option is enabled, the number of overtime hours will appear in red, just under the Total Hours calculation at the end of each employee's timestamps.
Timesheets - Daily
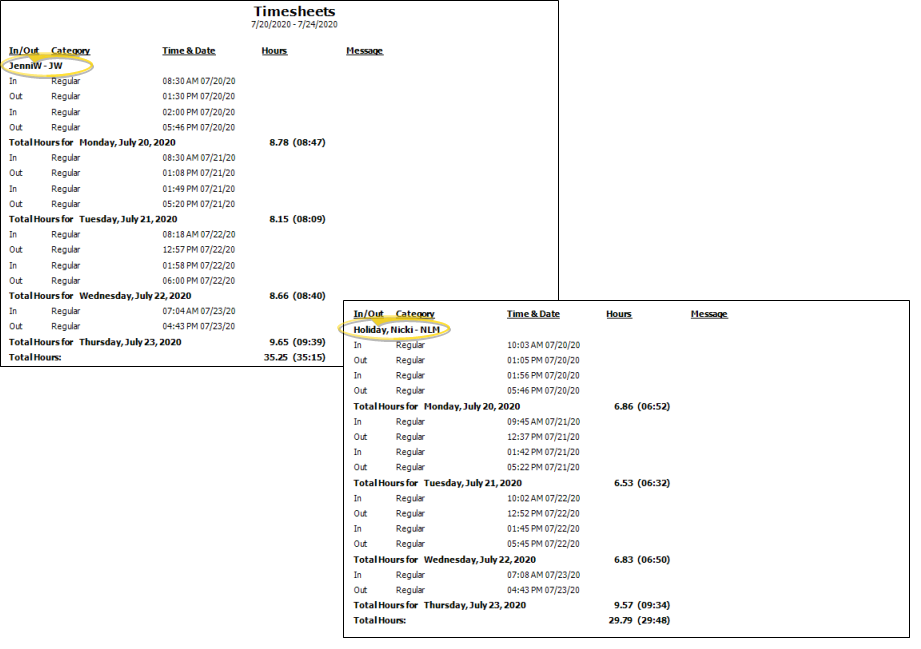
The Timesheets - Daily report lists all time stamps in the date range for each employee selected, sub-totaled by date as well as totaled for the specified date range per employee. The total hours worked are shown in both decimal and hour:minute format.The category column of each time stamp indicates whether the time is regular, vacation, or sick time. Each employee is printed on a separate page.
Timesheets - Daily Overtime
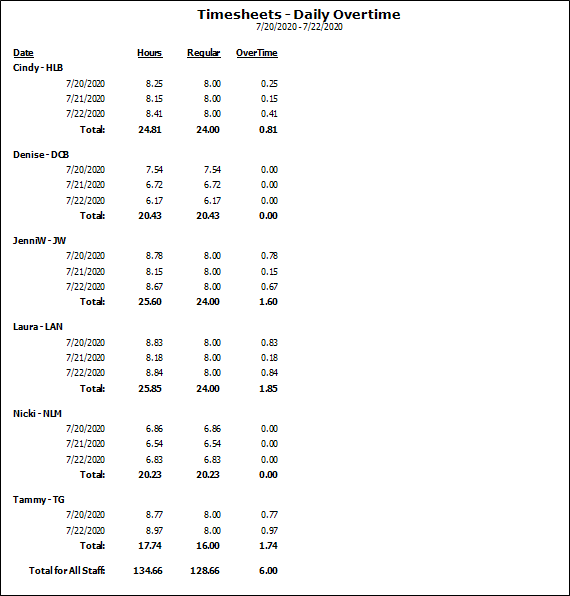
The Timesheets - Daily Overtime report breaks out overtime hours on a daily basis, instead of over 40 hours for the entire week, as required in some states. Overtime is started at the 8 hour mark each day.
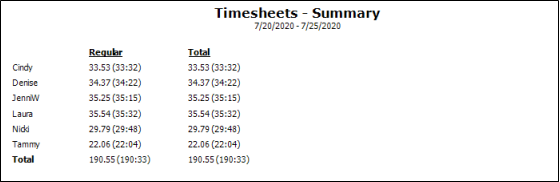
Timesheets - Summary
The Timesheets - Summary report lists each selected employee and the total number of hours worked during the date range you specified, in both decimal and hour:minute format. It does not include individual time stamps or hours worked per day.
Report Settings
Select the options to use for choosing records and generating this report. Choose carefully, as your selections will affect which patients are included in the report. (If the settings panel is not visible, click the Show/Hide icon in the upper left corner of the Reporting window.)
Start / End Dates - Enter the range of dates to include on this report, or select a single date for both the Start Date and End Date fields to run the report for an individual date. You can type a date in the fields, or click the calendar icon to select a date. Your selected date or date range will appear just under the report title when you view your report; if you select a date that is not today, this date will be different than the run date that appears in the report header.
Employees - (Not available for the Timesheet Edits report.) Click each employee name you would like to include on the report. Or, enable All Employees to include everyone. In most timesheet reports, you can optionally include inactive employee records in the list.
Additional Settings for Timesheets Report Only
Include Page Break - Enable this option to print each person's timesheet on a separate piece of paper. If this option is disabled, the timesheets for multiple people may be printed on a single sheet of paper.
Show Audit Time - Enable this option to include the actual date and time each time stamp was entered into your system. If this audit time stamp is different from the timesheet time stamp, it appears red in the report.
Show Overtime - Enable this option to include the total number of regular hours that are overtime hours. The overtime category appears only if the employee has overtime, and appears in red.
View Report Results
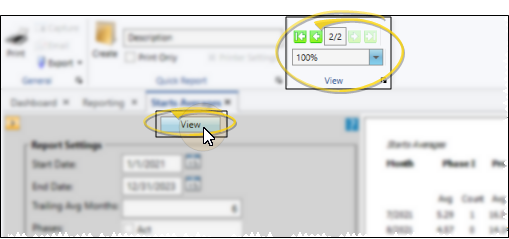
If needed, click View at the top of the report settings panel to view the results on your screen. When you run a report or form from your Recent Report list, or when you run a Quick Report, the initial results are sent to your screen immediately, with one exception: A Quick Report that has the Print Only option enabled will not show your results on the screen at all, but continue with the printing options. You can use the arrows in the View section of the ribbon bar to view additional pages of a multiple-page report. You can also use the dropdown button or type a number in the zoom field to change the size of the report in your window.
Report Title & Header
Whether you view the report on your screen or print it, the report title and run date appear in the header of each report page. If you used subgrouping or other report options, that information appears just under the report title so you know which criteria was used to generate the results.
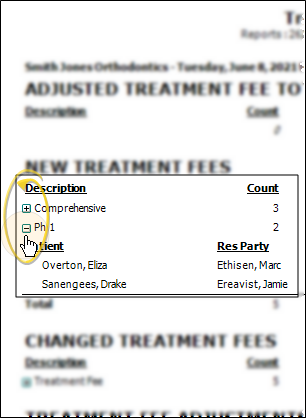
Show / Hide Details
If this report supports showing / hiding the details that comprise report totals, you can click the expand / collapse icons to show / hide the details. Not all Edge Cloud reports support this feature. If your cursor changes to look like a hand, the feature is available.
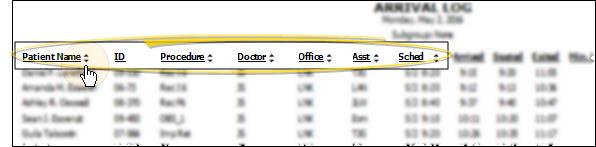
Use Arrows to Re-Sort Report
While viewing certain Edge Cloud reports, you can use the arrow beside certain column headings to re-sort the report according to that column's criteria. Click the arrows a second time to sort that column in reverse order, or click the arrows beside a different column to change the sort order again. (Not all Edge Cloud reports support this feature. If your cursor changes to look like a hand, the feature is available.)
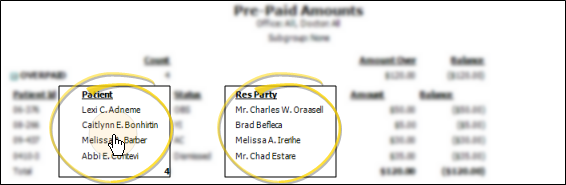
Open the Patient Folder / Responsible Party Record
While viewing some Edge Cloud reports, you can click a patient name or responsible party name to open that record. Not all Edge Cloud reports support this feature. If your cursor changes to look like a hand, the feature is available.
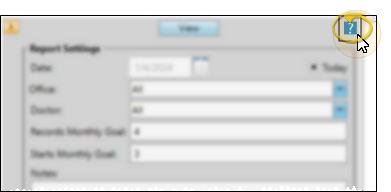
Get Detailed Report Description
Click the icon to the right of the View button to open the help article with the detailed description of the report.
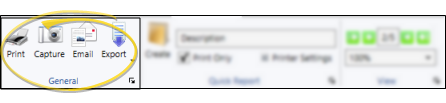
Choose the Output
With the results on your screen, you can choose the output with the toolbar at the top of the report window. See "Report Output Options" for details.