Treatment Efficiency Report
Run a Treatment Efficiency report to obtain a list of patients whose actual appliance removal date is within the range of dates you specify. The report includes the patient's treatment months, number of emergency appointments, and number of total appointments kept throughout treatment, as well as financial data for the completed treatment phase. You can run the report for an individual doctor or office, or include all orthodontists and offices on the report.
Report Requirements
- To be included on the report, a patient must satisfy certain treatment date and contract requirements.
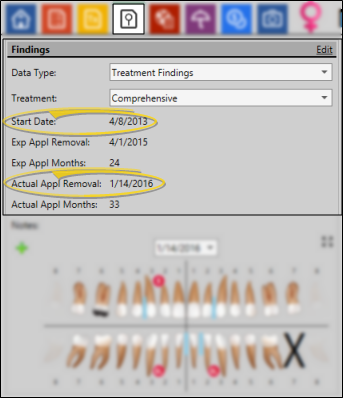
Start Date and Actual Appliance Removal Date - The patient must have a start date for the treatment, and an actual appliance removal date that falls within the date range you specify, recorded on the Findings page of the patient folder.
Contract - The patient must have a contract that is assigned to the same treatment phase as the actual appliance removal date.

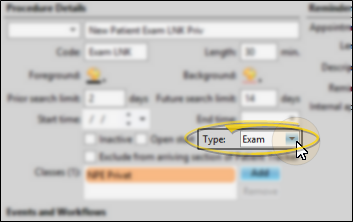
Emergency Visit Procedures - To accurately track emergency visits on the report, you must flag your emergency visit procedures with the type of "emergency" in your Appointment Type / Procedure editor. See "Appointment Type / Procedure Editor" for details. about assigning the "type". In addition, appointments must be processed as Kept before they will be included on this report.
Run This Report
-
Open the Report
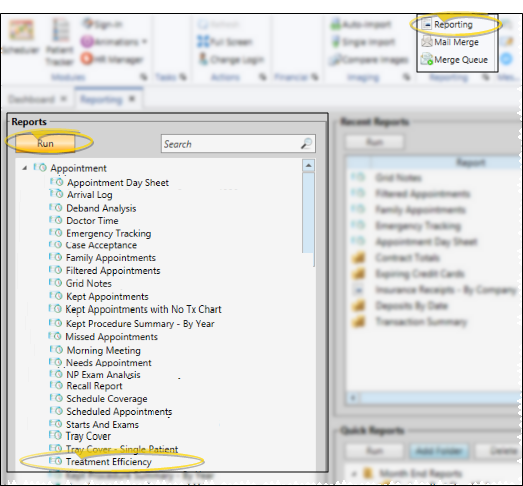
- Home ribbon bar > Reporting section > Reporting > Appointment > Treatment Efficiency > Run. (You can also use the Search field to find the report you want to work with.) You might also be able to run this report or form from your Recent Reports or Quick Reports list. See "Run Edge Cloud Reports" for details.
-
Choose Report Settings
- Select the options to use for choosing records and generating this report. Choose carefully, as your selections will affect which patients are included in the report. (If the settings panel is not visible, click the Show/Hide icon in the upper left corner of the Reporting window.)
Start / End Dates - Enter the range of dates to include on this report, or select a single date for both the Start Date and End Date fields to run the report for an individual date. You can type a date in the fields, or click the calendar icon to select a date. Your selected date or date range will appear just under the report title when you view your report; if you select a date that is not today, this date will be different than the run date that appears in the report header.
Office - Choose to include only the records for a specific office, or include the records for all office locations in your practice.
Orthodontist / Doctor - Choose to include only the records for a specific orthodontist / doctor, or include the records for all orthodontists in your practice.
-
Subgroup - You can optionally choose a subgroup to use to narrow the records to include on the report. Only records that fit your selected subgroup as well as all other report settings will be included. If you use a subgroup, the report will display the name of your selected subgroup just under the report name, so you know which criteria was used to generate the results. See "Subgroup Editor" for details.about creating subgroups.
-
View Results - If needed, click View at the top of the report settings panel to view the results on your screen. When you run a report or form from your Recent Report list, or when you run a Quick Report, the initial results are sent to your screen immediately, with one exception: A Quick Report that has the Print Only option enabled will not show your results on the screen at all, but continue with the printing options.
-
Manage Options and Output - With the results on your screen, you can choose the output with the toolbar at the top of the report window. See "Report Output Options" for details.
More Information
Report Fields
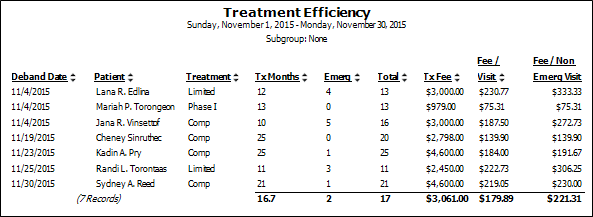
- This report includes statistics about the patient's completed treatment phase, including the number of months in treatment, the number of appointments kept, the total treatment fee for the completed treatment, and the calculated fee per visit. The end of the report includes an average for each report field.
Deband Date - This is the actual appliance removal date for this treatment phase, found on the Findings page of the patient folder.
Patient - This is the patient name, You can click the name to open the patient folder.
Treatment - This is the treatment phase for which the actual appliance removal date falls within your selected date range. Note that patients may have other treatments still in progress, or treatment with other removal dates that are not included in this report.
Tx Months - This is the number of months the patient was in this treatment phase, calculated from the start date and the actual appliance removal date for this treatment, as found on the Findings page of the patient folder.
Emerg. - This is the number of emergency visits (as determined by the appointment procedure type) that the patient kept at your office during this treatment. (See "Appointment Type / Procedure Editor" for details about assigning procedure types.
Total - This is the total number of appointments, including emergency visits, that the patient kept at your office during this treatment.
Tx Fee - This is the sum of all contracts assigned to this treatment.
Fee / Visit - This is the treatment fee amount divided by the total number of appointments kept at your office during this treatment.
Fee / Non-Emerg. Visit - This is the treatment fee amount divided by the number of appointments, less the number of emergency visits.
Report Title & Header - Whether you view the report on your screen or print it, the report title and run date appear in the header of each report page. If you used subgrouping or other report options, that information appears just under the report title so you know which criteria was used to generate the results.
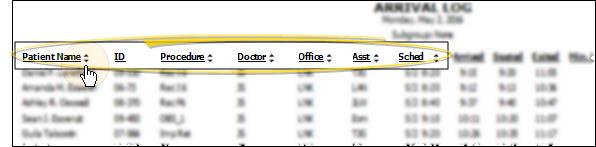
Use Arrows to Re-Sort Report
While viewing certain Edge Cloud reports, you can use the arrow beside certain column headings to re-sort the report according to that column's criteria. Click the arrows a second time to sort that column in reverse order, or click the arrows beside a different column to change the sort order again. (Not all Edge Cloud reports support this feature. If your cursor changes to look like a hand, the feature is available.)
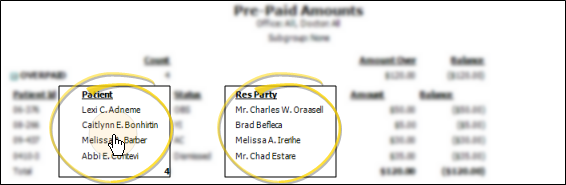
Open the Patient Folder / Responsible Party Record
While viewing some Edge Cloud reports, you can click a patient name or responsible party name to open that record. Not all Edge Cloud reports support this feature. If your cursor changes to look like a hand, the feature is available.