Charge and Receipt Summary Report
Run the Charge and Receipt Summary report to obtain the Total Charges, Charges Due, Receipts, and Treatment Fees for the range of dates you select. The report provides corresponding numbers for the same time period the prior year, as well as the percentage of difference. We recommend running this report by a month, quarter, and year.
Posted Date Not Finalized Date Used - This report calculates transactions by the posted transaction date, not by the finalized transaction date: Many other Edge Cloud financial reports use the finalized transaction date, so this report may differ by the dollar amount of transactions that were posted with a date other than the date the transactions were finalized. Also unlike certain other financial reports, transactions on this report do NOT have to be finalized to be included.
Open the Report
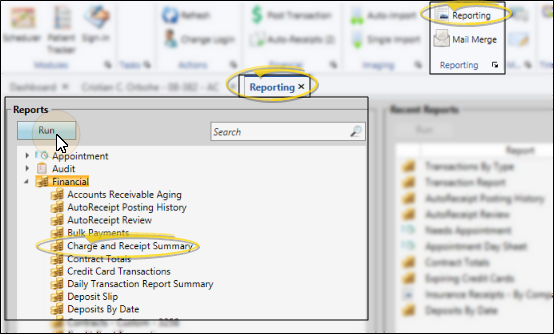
Select Reporting from the Reporting section of the Home ribbon bar. Then from the Financial section, open the Charge and Receipt Summary report. You can double-click the report name, or click Run at the top of the window to continue. (You can also use the Search field to find the report you want to work with.) You might also be able to run this report or form from your Recent Reports or Quick Reports list. See "Run Edge Cloud Reports" for details.
Report Settings
Select the options to use for choosing records and generating this report. Choose carefully, as your selections will affect which patients are included in the report. (If the settings panel is not visible, click the Show/Hide icon in the upper left corner of the Reporting window.)
Date Range or Smart Date - Enter the range of dates to include on this report, or select a single date for both the Start Date and End Date fields to run the report for an individual date. You can type a date in the fields, or click the calendar icon to select a date. You can also enable a Smart Date option to automatically calculate the dates for you. When a Smart Date is enabled, any dates you enter manually are ignored. Your selected date or date range will appear just under the report title when you view your report; if you select a date that is not today, this date will be different than the run date that appears in the report header.
Office - Choose to include only the records for a specific office, or include the records for all office locations in your practice.
Orthodontist / Doctor - Choose to include only the records for a specific orthodontist / doctor, or include the records for all orthodontists in your practice.
Specialty - If you have Edge Specialist, you can choose to include only records for a specific specialty, or include the records for all specialties in your practice.
View Report Results
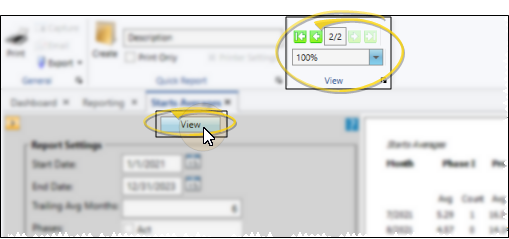
If needed, click View at the top of the report settings panel to view the results on your screen. When you run a report or form from your Recent Report list, or when you run a Quick Report, the initial results are sent to your screen immediately, with one exception: A Quick Report that has the Print Only option enabled will not show your results on the screen at all, but continue with the printing options. You can use the arrows in the View section of the ribbon bar to view additional pages of a multiple-page report. You can also use the dropdown button or type a number in the zoom field to change the size of the report in your window.
Report Title & Header
Whether you view the report on your screen or print it, the report title and run date appear in the header of each report page. If you used subgrouping or other report options, that information appears just under the report title so you know which criteria was used to generate the results.
Show / Hide Details
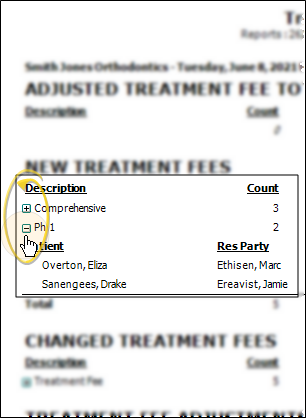
If this report supports showing / hiding the details that comprise report totals, you can click the expand / collapse icons to show / hide the details. Not all Edge Cloud reports support this feature. If your cursor changes to look like a hand, the feature is available.
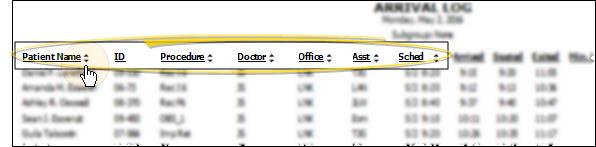
Use Arrows to Re-Sort Report
While viewing certain Edge Cloud reports, you can use the arrow beside certain column headings to re-sort the report according to that column's criteria. Click the arrows a second time to sort that column in reverse order, or click the arrows beside a different column to change the sort order again. (Not all Edge Cloud reports support this feature. If your cursor changes to look like a hand, the feature is available.)
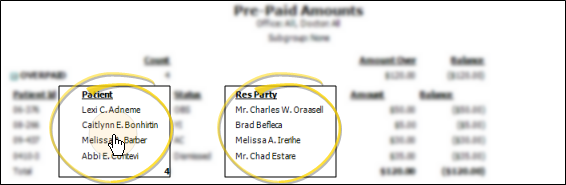
Open the Patient Folder / Responsible Party Record
While viewing some Edge Cloud reports, you can click a patient name or responsible party name to open that record. Not all Edge Cloud reports support this feature. If your cursor changes to look like a hand, the feature is available.
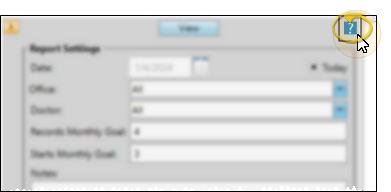
Get Detailed Report Description
Click the icon to the right of the View button to open the help article with the detailed description of the report.
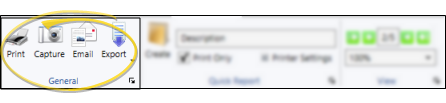
Choose the Output
With the results on your screen, you can choose the output with the toolbar at the top of the report window. See "Report Output Options" for details.
Report Calculations
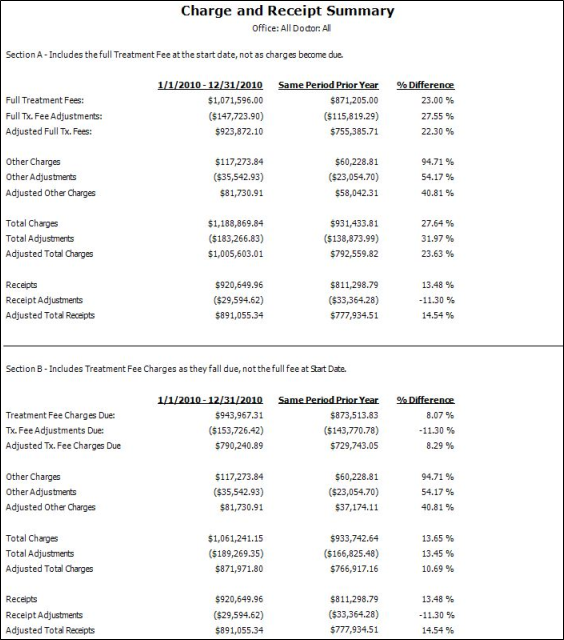
Section A – This section includes full treatment fees at the contract start date, not as charges become due. So, if you created a contract with a start date within your report dates, the entire amount would be included in the Full Treatment Fees figure in this section of the report.
Section B – This section includes treatment fee charges as they fall due, not the full fee at the contract start date. This means that only contract charges (initial, period, and retention fees) that have fallen due within your selected report dates will be included in the Treatment Fee Charges Due figure in this section of the report.
Same Period Prior Year and % Difference – All figures in both sections of the report show the corresponding figures for the same time period in the previous calendar year, as well as the percentage of difference between the two. These columns help you identify production and receipt trends in your practice.