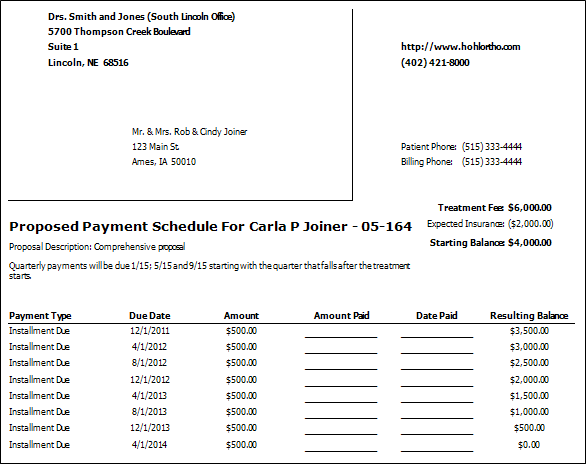
Proposal Schedule Form
Run a Proposal Schedule form to generate the list of scheduled transactions for a proposed orthodontic contract created with the Edge Cloud legacy proposal system. The form lists the scheduled transaction amounts and dates for each responsible party involved, as well as the description entered in the proposal details. If the responsible party has insurance coverage, the total expected insurance amount is included on the form. No miscellaneous charges are included on the form. Proposal Schedules can be printed, or exported in a variety of formats.
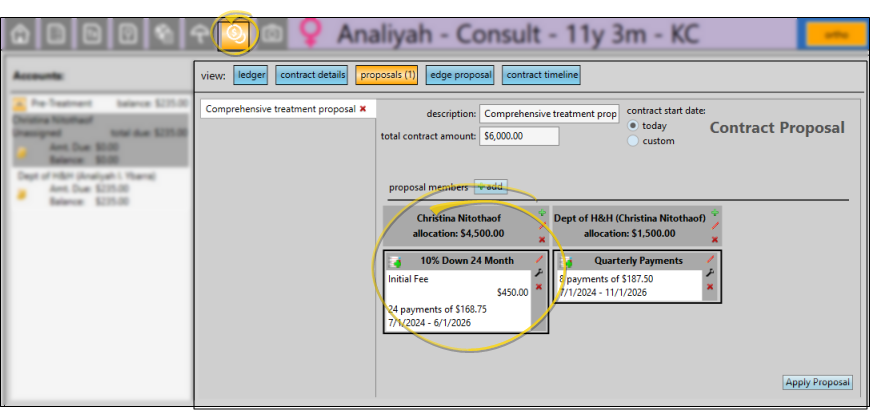
Legacy Proposal Topic - This topic references the legacy Edge Cloud proposal system. See "Edge Proposal" for details for information about using the Edge Proposal system instead.
Data Source- This form gets its data from legacy contract proposals you have created for your patients, found on the Findings page of the patient folder. Note that if you have Edge Specialist, this form only works for contract proposals created for your orthodontics specialty. See "Contract Proposals (Legacy Proposal System)" for details.
No Correspondence History Tracking - There is no audit trail for this form: It is not added to the patient's correspondence history when it is printed.
Get Started with Proposal Schedules
Choose Default Format
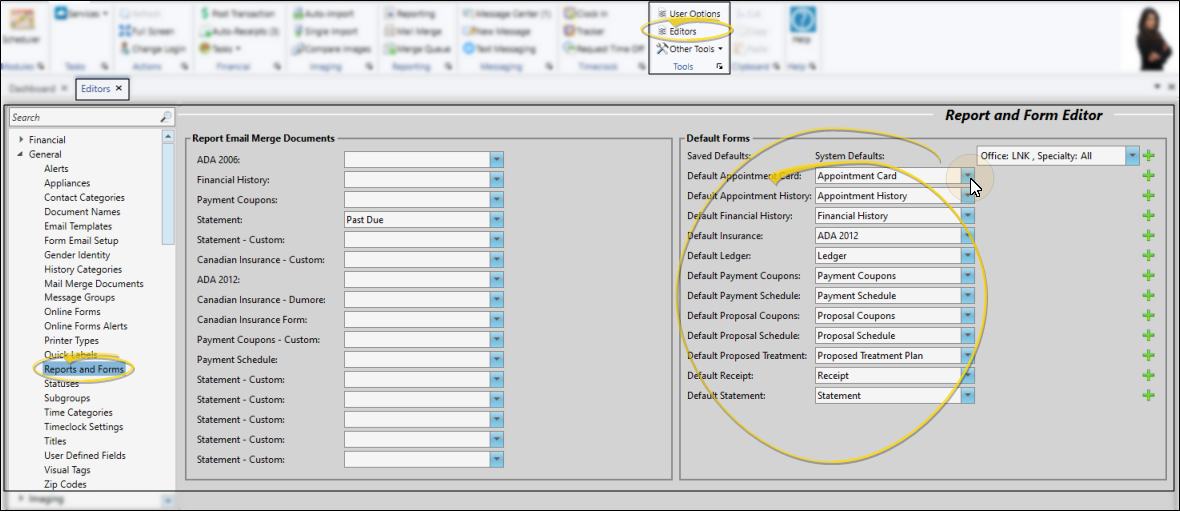
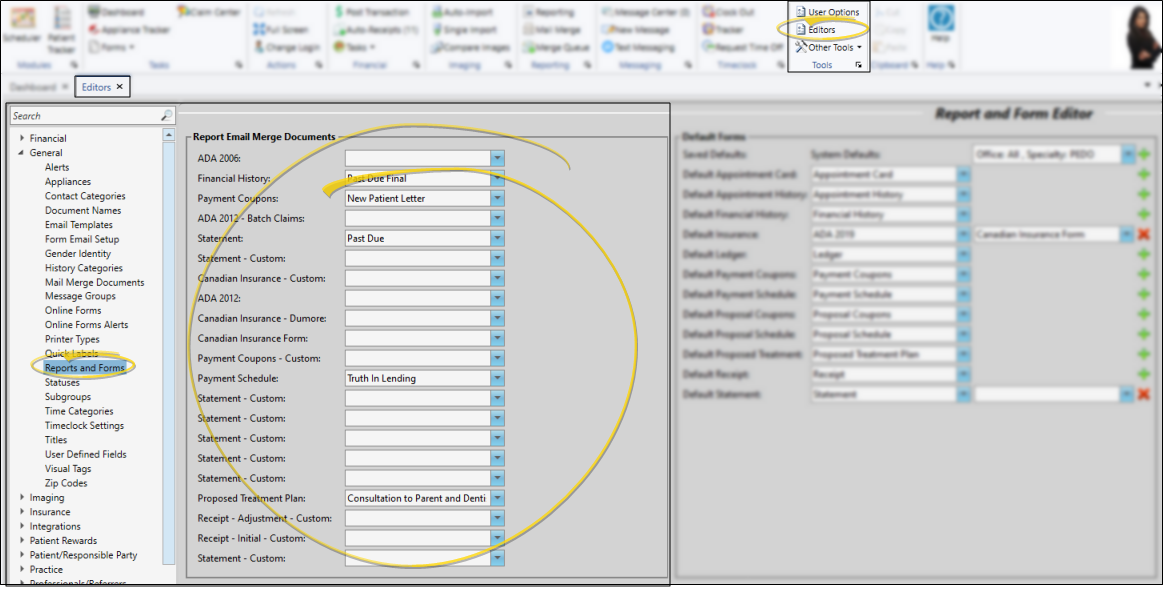
Use the Default Forms section of your Reports and Forms editor to select the default format to use for paper forms. This is the format that will be selected when you run the form from the Forms option of the Home or Patient ribbon bar. If you have purchased customized forms, you may choose your form as the default. If needed, you can set up different default forms for individual offices and specialties in your practice. See "Reports and Forms Editor" for details.
Assign Email Merge Document
If you will be emailing this form to your patients and parents, use your Reports and Forms editor to assign the mail merge document to use as the text of your email message. See "Reports and Forms Editor" for details.
Email Type Required - The mail merge document you assign to a form must specify the Email Type in the Mail Merge Documents editor in order for this feature to function properly.
When you email a form, the name of the assigned mail merge document will be the email subject, the text of the mail merge document will be the email message, and the form will be sent as a PDF attachment. In addition, the mail merge document and the form will be entered as separate items in the patient's correspondence history.
Open the Form
You can open this feature in multiple ways: Use the method that's most convenient for you.
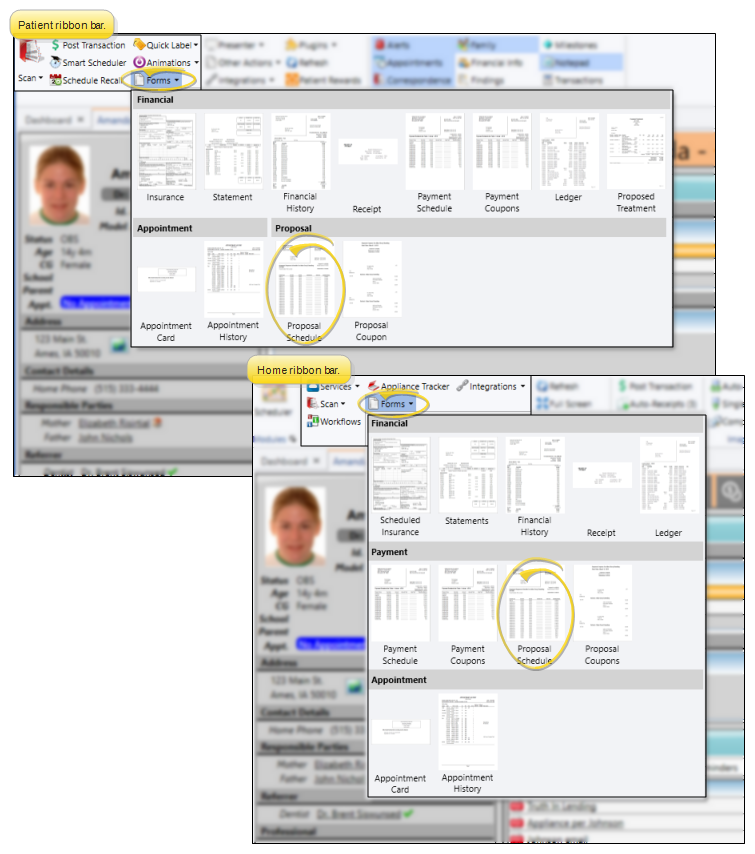
Patient or Home Ribbon Bar
Select Forms then Proposal Schedule from the Patient section of the Patient ribbon bar, or from the Tasks section of the Home ribbon bar. (An Edge Cloud patient folder must be open for the Patient ribbon bar to be available.)
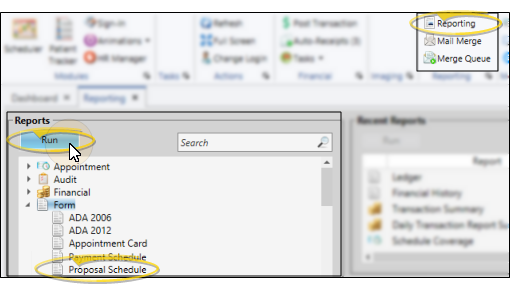
Reporting Window
Select Reporting from the Reporting section of the Home ribbon bar. Then from the Form section, open the Proposal Schedule form. (You can also use the Search field to find the form you want to work with.) You might also be able to run this form from your Recent Reports or Quick Reports list. See "Run Edge Cloud Reports" for details.
Proposal Schedule Settings
Select the options to use for choosing records and generating this report. Choose carefully, as your selections will affect which data is included in the report. (If the report settings panel is not visible, click the Show/Hide icon in the upper left corner of the Reporting window.)
Quick Report Settings - When you print a form from the Patient or Home ribbon bar, the results default to the Quick Report settings. If those settings include printing the form immediately, you will not have an opportunity to review before the form prints. See "Quick Reports" for details about creating / updating these settings.
Patient - If you did not open the report with a patient active, use the Patient field to select the patient to work with. If you select a subgroup, as described below, this field is ignored.
Use Patient Office Address - By default, when the header / footer is printed on a form, the name and address from your Practice editor is printed. You can, however, enable the Use Patient Office Address option to print the Billing Address of the office the patient is currently assigned to in the Patient Information Panel instead.
Subgroup - You can optionally choose a subgroup to use to narrow the records to include on the report. Only records that fit your selected subgroup as well as all other report settings will be included. If you use a subgroup, the report will display the name of your selected subgroup just under the report name, so you know which criteria was used to generate the results. See "Subgroup Editor" for details.about creating subgroups.
View Report Results
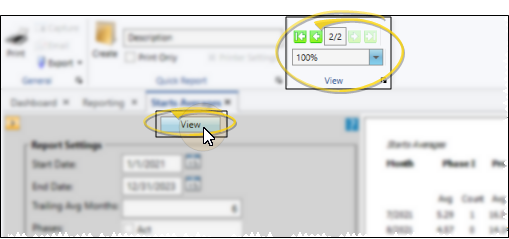
If needed, click View at the top of the report settings panel to view the results on your screen. When you run a report or form from your Recent Report list, or when you run a Quick Report, the initial results are sent to your screen immediately, with one exception: A Quick Report that has the Print Only option enabled will not show your results on the screen at all, but continue with the printing options. You can use the arrows in the View section of the ribbon bar to view additional pages of a multiple-page report. You can also use the dropdown button or type a number in the zoom field to change the size of the report in your window.
Report Title & Header
Whether you view the report on your screen or print it, the report title and run date appear in the header of each report page. If you used subgrouping or other report options, that information appears just under the report title so you know which criteria was used to generate the results.
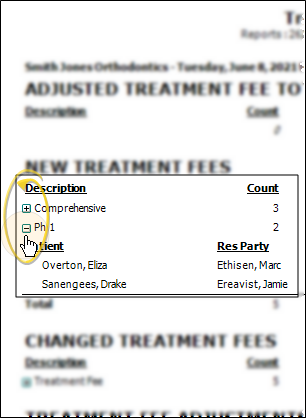
Show / Hide Details
If this report supports showing / hiding the details that comprise report totals, you can click the expand / collapse icons to show / hide the details. Not all Edge Cloud reports support this feature. If your cursor changes to look like a hand, the feature is available.
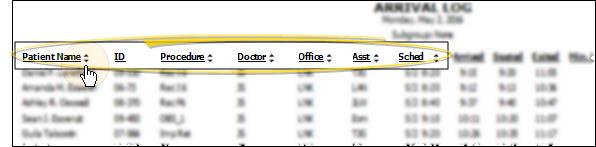
Use Arrows to Re-Sort Report
While viewing certain Edge Cloud reports, you can use the arrow beside certain column headings to re-sort the report according to that column's criteria. Click the arrows a second time to sort that column in reverse order, or click the arrows beside a different column to change the sort order again. (Not all Edge Cloud reports support this feature. If your cursor changes to look like a hand, the feature is available.)
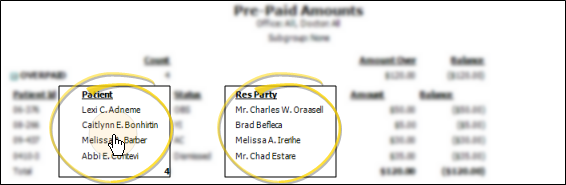
Open the Patient Folder / Responsible Party Record
While viewing some Edge Cloud reports, you can click a patient name or responsible party name to open that record. Not all Edge Cloud reports support this feature. If your cursor changes to look like a hand, the feature is available.
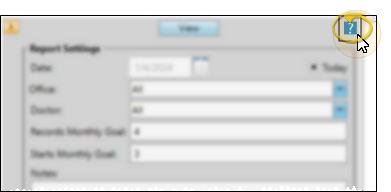
Get Detailed Report Description
Click the icon to the right of the View button to open the help article with the detailed description of the report.
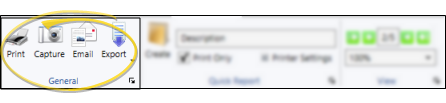
Choose the Output
With the results on your screen, you can choose the output with the toolbar at the top of the report window. See "Report Output Options" for details.