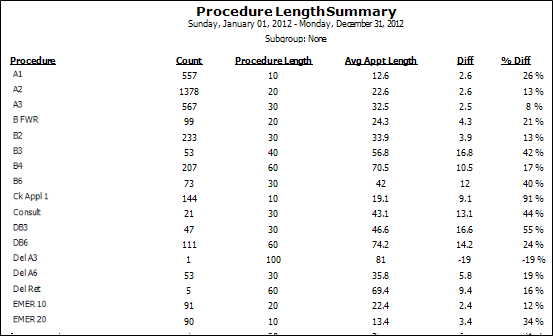
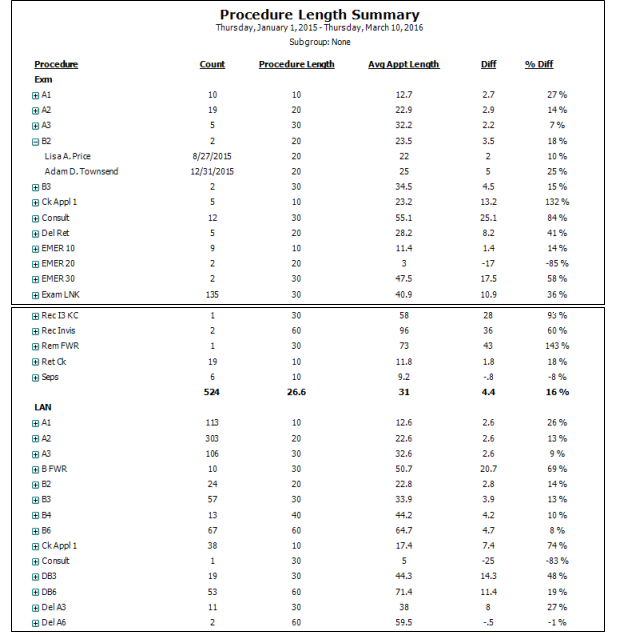
Procedure Length Summary
Run the Procedure Length Summary report to review the contrast between the amount of time you schedule for procedures with the time it actually takes to perform an appointment, according to the data you collect as you process patients through your Patient Tracker system.
Get Started
Update Patient Tracker - You must use thePatient Tracker updating features regularly to obtain accurate data for this report. See "Patient Tracker" for details.
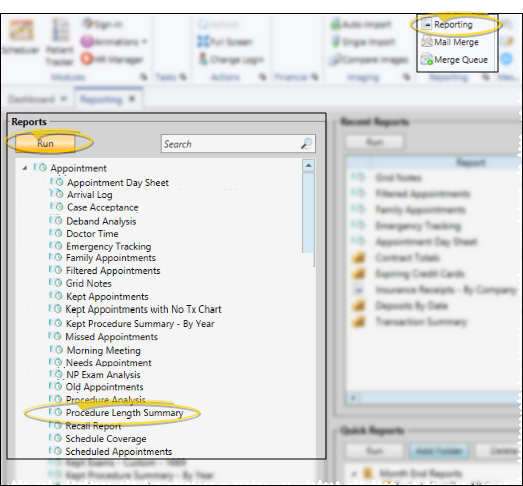
Run This Report
-
Open the Report
- Home ribbon bar > Reporting section > Reporting > Appointment > Procedure Length Summary > Run. (You can also use the Search field to find the report you want to work with.) You might also be able to run this report from your Recent Reports or Quick Reports list. See "Run Edge Cloud Reports" for details.
-
Report Settings
- Select the options to use for choosing records and generating this report. Choose carefully, as your selections will affect which patients are included in the report. (If the settings panel is not visible, click the Show/Hide icon in the upper left corner of the Reporting window.)
Start / End Dates - Enter the range of dates to include on this report, or select a single date for both the Start Date and End Date fields to run the report for an individual date. You can type a date in the fields, or click the calendar icon to select a date. Your selected date or date range will appear just under the report title when you view your report; if you select a date that is not today, this date will be different than the run date that appears in the report header.
Group by Assistant - Enable this option to group the report results by the assistant assigned to each appointment. When you generate this report, the data is calculated per assistant rather than cumulatively, and you can expand and collapse the appointment details for each assistant.
Office - Choose to include only the records for a specific office, or include the records for all office locations in your practice.
Orthodontist / Doctor - Choose to include only the records for a specific orthodontist / doctor, or include the records for all orthodontists in your practice.
-
Subgroup - You can optionally choose a subgroup to use to narrow the records to include on the report. Only records that fit your selected subgroup as well as all other report settings will be included. If you use a subgroup, the report will display the name of your selected subgroup just under the report name, so you know which criteria was used to generate the results. See "Subgroup Editor" for details.about creating subgroups.
-
View Results - If needed, click View at the top of the report settings panel to view the results on your screen. When you run a report or form from your Recent Report list, or when you run a Quick Report, the initial results are sent to your screen immediately, with one exception: A Quick Report that has the Print Only option enabled will not show your results on the screen at all, but continue with the printing options.
-
Manage Options and Output - With the results on your screen, you can choose the output with the toolbar at the top of the report window. See "Report Output Options" for details.
More Information
Report Title & Header - Whether you view the report on your screen or print it, the report title and run date appear in the header of each report page. If you used subgrouping or other report options, that information appears just under the report title so you know which criteria was used to generate the results.