Schedule Availability Report
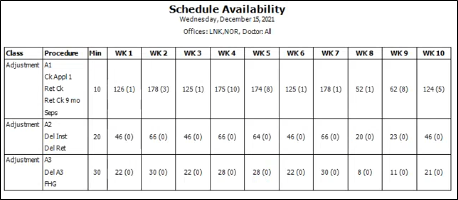
Run the Schedule Availability report to see how many weekly appointment openings you have for up to 10 weeks from the date you select, based on your Scheduler template classifications. You can choose which procedures and offices to include on the report, and optionally require that each opening begin with an Open Start cell. The report groups procedures by class, and in parenthesis shows the number of scheduled appointments for each procedure. You can optionally group by office, which separates the results of each office on a separate page.
Get Started
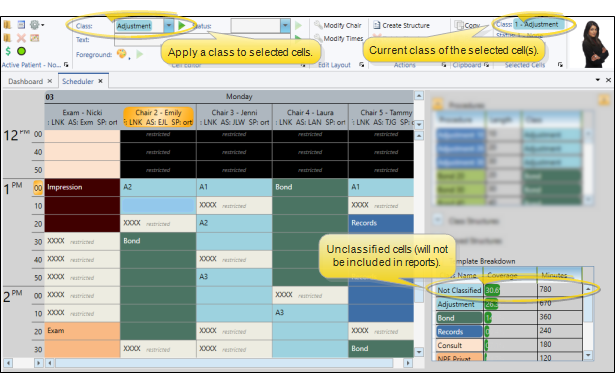
Classify Template Cells - The Schedule Availability report bases its results on how the cells of your Scheduler templates are classified. This means that the report only counts template cells that have been assigned to a class: Cells with no class assigned are ignored. See "Grid Template Editor" for details about applying classes to template cells. (You can use the Template Breakdown section of the Grid Template editor to see whether all your template cells have been classified.)
Run the Report
-
Open the Report
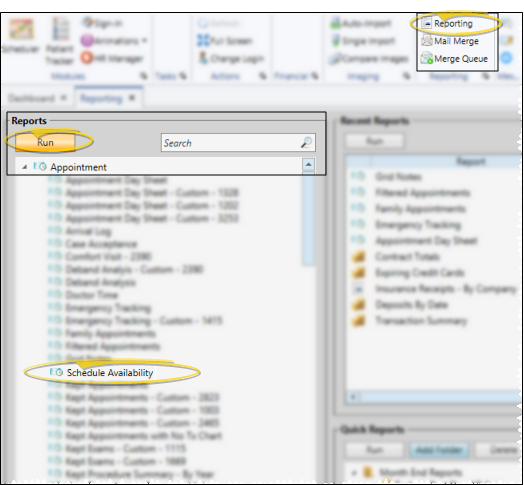
- Select Reporting from the Reporting section of the Home ribbon bar. Then from the Appointment section, open the Schedule Availability report. You can double-click the report name, or click Run at the top of the window to continue. (You can also use the Search field to find the report you want to work with.) You might also be able to run this report or form from your Recent Reports or Quick Reports list. See "Run Edge Cloud Reports" for details.
-
Report Settings
- Select the options to use for choosing records and generating this report. Choose carefully, as your selections will affect which patients are included in the report. (If the settings panel is not visible, click the Show/Hide icon in the upper left corner of the Reporting window.)
Date - Choose the date to use. You can type a date in the Date field, or click the v button to select a date from a calendar. You can also enable the Today option to use today's date. If Today is enabled, you cannot type a date or open the calendar: Disable the Today option first if you want to choose a specific date. The date or you select will appear just under the report title; if you select a date that is not "today", this date will be different from the run date that appears in the report header.
Weeks to Display - Select the number of weeks to include on the report (up to 10), starting from the date you chose above.
Use Open Start Match - Enable this option to count only appointment openings that begin with an Open Start cell.
Procedures and Classes - All of your scheduling classes are listed, along with their assigned procedures. You can select individual procedures to include in the report, or simply select a class heading to include all the procedures in that class. Or, use the Select All / Clear All buttons to choose / clear all classes and procedures. In addition, you can expand / collapse classes individually, or use the Collapse All / Expand All button to list only class headings, or all procedures in all classes.
Office - Choose the offices to include on the report, or use Select All / Clear All to include / clear all office locations.
Group By Office - Enable this option to sort the appointment openings by office, and print the results for each office on separate pages. If this option is disabled, all the appointment openings will be lumped together.
Orthodontist / Doctor - Choose to include only the records for a specific orthodontist / doctor, or include the records for all orthodontists in your practice.
-
View Results - If needed, click View at the top of the report settings panel to view the results on your screen. When you run a report or form from your Recent Report list, or when you run a Quick Report, the initial results are sent to your screen immediately, with one exception: A Quick Report that has the Print Only option enabled will not show your results on the screen at all, but continue with the printing options.
-
Manage Options and Output - With the results on your screen, you can choose the output with the toolbar at the top of the report window. See "Report Output Options" for details.