Schedule Coverage Report
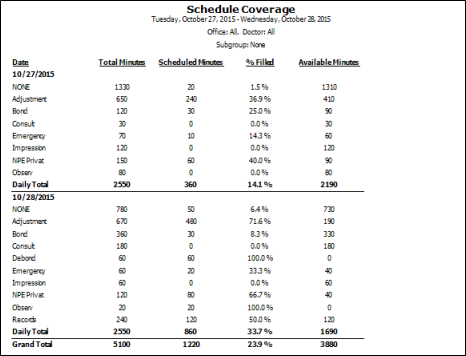
Run the Schedule Coverage report to obtain the number of minutes and percentages of your day that have been scheduled for certain classes of appointments. The report includes the total number minutes assigned to each class, the total number of minutes scheduled for each class, the percentage of assigned class units that have been scheduled, and the number of "open" minutes remaining for each class. The report calculates totals for each day, as well as a grand total of all included dates. You can run the report for any range of dates, and choose to include the scheduling cells assigned to a specific orthodontist or office, or choose to include all doctors and locations.
Get Started
Classify Your Scheduling Grids
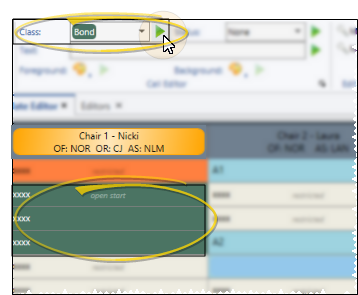
- The Schedule Coverage report uses the classes you have assigned to your scheduling grid cells, and the orthodontist and office you have assigned to your chairs, to determine how to categorize appointments: Be sure you have classified your grid cells and assigned doctors and locations to chairs appropriately. (See "Grid Template Editor" for details.)
Certain Edge Cloud reports, including the Schedule Coverage report, make their calculations based on the classes you have assigned to your scheduling cells, not the classes assigned to theappointment type / procedure. For example, if you schedule an appointment classified as an "Adjustment" in a cell that you have classified as "Emergency", the Scheduled Coverage report will calculate the cell as Emergency minutes, and not Adjustment minutes. To prevent this from occurring, you can use your Security editor to restrict scheduling appointments to areas they are not classified for. (Editors > Practice > Security > Scheduling Security Group > Allow Scheduling a Procedure Not Classified for Location > No Access. See "Security Editor" for details.)
Run This Report
-
Open the Report
- Home ribbon bar > Reporting section > Reporting > Appointment > Schedule Coverage> Run. (You can also use the Search field to find the report you want to work with.) You might also be able to run this report or form from your Recent Reports or Quick Reports list. See "Run Edge Cloud Reports" for details.

-
Report Settings
- Select the options to use for choosing records and generating this report. Choose carefully, as your selections will affect which data is included in the report. (If the report settings panel is not visible, click the Show/Hide icon in the upper left corner of the Reporting window.)
Include Restricted Cells - Enable this option to include the time allotted to cells flagged as "restricted" (not available for appointments) in the calculations. Otherwise, these cells will not be taken into account in times listed on the report.
Start / End Dates - Enter the range of dates to include on this report, or select a single date for both the Start Date and End Date fields to run the report for an individual date. You can type a date in the fields, or click the calendar icon to select a date. Your selected date or date range will appear just under the report title when you view your report; if you select a date that is not today, this date will be different than the run date that appears in the report header.
Classes to Include - Choose to include individual scheduling classes, or enable the All Classes option to include all classes on the report. You can also enable None, at the bottom of the Classes list, to obtain the minutes and percentage of your day that is not assigned to any scheduling class.
Office - Choose to include only the records for a specific office, or include the records for all office locations in your practice.
Orthodontist / Doctor - Choose to include only the records for a specific orthodontist / doctor, or include the records for all orthodontists in your practice.
-
Subgroup - You can optionally choose a subgroup to use to narrow the records to include on the report. Only records that fit your selected subgroup as well as all other report settings will be included. If you use a subgroup, the report will display the name of your selected subgroup just under the report name, so you know which criteria was used to generate the results. See "Subgroup Editor" for details.about creating subgroups.
-
View Results - If needed, click View at the top of the report settings panel to view the results on your screen. When you run a report or form from your Recent Report list, or when you run a Quick Report, the initial results are sent to your screen immediately, with one exception: A Quick Report that has the Print Only option enabled will not show your results on the screen at all, but continue with the printing options.
-
Manage Options and Output - With the results on your screen, you can choose the output with the toolbar at the top of the report window. See "Report Output Options" for details.
More Information
Report Title & Header - Whether you view the report on your screen or print it, the report title and run date appear in the header of each report page. If you used subgrouping or other report options, that information appears just under the report title so you know which criteria was used to generate the results.